170 Pi: Useful Raspberry Pi Device Family Terminal Commands (170.html)
Keywords:
ICH180RR "Raspberry Pi" "Pi Pico" KoldAdvice D@CC "Remote Desktop Connection" RDP
Kold Model Serial "Serial Number" IP "IP Address" PiR2 "PiR2 logging system" Cole
Cytron Maker pHAT sxiv alarm Environ Accessories Maker Pi pHAT "sh Environ.sh"
Environ.sh "3D printer" Alarm "StationDump" "StationDump.sh" Serial
"Thonny Python Packages" "IX Packages" IXsample.py "IX Library" show2
"IX folder" IX Raspberry.py PythonPackageCreation.txt
"Raspberry Pi Issues" " RPi Issues "
Benchmarks Whetstone AikonCWD "Nick Heath"
Linpack diff meld md5_IX xsel
stackoverflow stack "Engine Code Scanners" OBD-II
Click on the photo to enlarge it.
RPi and Logo
Introduction
The LINUX commands described here are useful when dealing with Raspberry Pi computers.
Over the past 10 years, my collection of Raspberry Pi computers, pico microcomputers, dongles, accessories and micro SDcards has grown to the point
where it has become unmanageable. I have found it difficult to distinguish between the many various computers and SDcards. I have finally assigned
a unique number to label each of these devices. These unique numbers are listed in Source 21 which is my Article 167. This article also attempts
to indicate the SDcard # that was used with which RPi computer # and with which accessory board for each experiment. Storing my numerous microSDcards has also become an issue. A friend with a 3D printer has graciously made me some little plastic cases (Source 22) where I can store my microSDcard and a few normal SDcards. People who use only one
RPi computer will probably find that this level of documentation is overkill.
I also found it necessary to document the environment for each experiment. The possilbe combinations for each experiment has really grown. In
order to view the digital environment, at a single glance, I created a shell command named "Environ.sh". To view the current environment at any
time, in Terminal mode, I merely type:
All but one of these shell commands leaves the environment (configuration) of a Raspberry PC unchanged. It is only the TimeZone.sh (and the Environ.sh) command that makes a change. The only change that it makes is by setting (defining) the TimeZone to "America/Toronto". Occassionally, this was found to be necessary when
the Raspberry OS thought that another TimeZone was being used. (Perhaps, it was the user[me] who created this error.) In any case, use of the
Environ.sh command always sets my TimeZone correctly.
>$ sh Environ.sh
This Environment list includes the following :
Time Zone          America/Toronto
Date/Time          Tue 22 Feb 2022 01:08:54 PM EST
SDcard SN          _Fla73S032G
OS name            "Raspbian GNU/Linux 10 (buster)"
Sys vol use        29G  6.3G   21G  24% /
RAM use            Mem:          3.7Gi       767Mi       2.1Gi       197Mi       964Mi       2.7Gi
                   Swap:          99Mi          0B        99Mi
PC model           Raspberry Pi 400 Rev 1.0
Overscan           Disable  on  Zero 2 is best
PC SN              1000000051b6d000
IP in Router       192.168.1.116
WiFiMnemonic       classiccar925
Interfaces         /dev/gpiochip0	/dev/gpiomem  /dev/spidev0.0
                   /dev/gpiochip1	/dev/i2c-1    /dev/spidev0.1
PiFont             Monospace Regular 10
Accessories:
RDCMnemonic        LydieArthur$
Printer          xCanon MX520 series Printer WS
GPIO               Maker pHAT, PiR2null
I2C                none
USB                none
Pico SN            none
ALARM              Visual:sxiv   Pictures/alarm.png
ALARM              Audible:aplay Music/alarm.wav
AUDIO              HDMI, BT MiniTunes Speaker
Program1           MakerpHATDemocode.py
Program2           read_GPIO_D.py
Most of the above are self-explanatory, however GPIO and I2C show which devices are attached to each communications bus. The main program(s)
used for each experiment is also shown. The x indicates that I am having difficulty accessing this network printer (as of 2022BFeb22). For
each computer/microcomputer, the Serial Number (noted by SN) is merely the rightmost 4 digits of the SN. I label each such device with only
the rightmost 4 characters of the long SN. The information following "Accessories:" was editted by me. It was not gleaned from other
information stored in the system.
Other shell commands that I created and use are:
>$ sh Aikon_Summ.sh
>$ sh Alarm.sh
>$ sh Environ.sh
>$ sh IX_Bench.sh
>$ sh IX_log.sh
>$ sh StationDump.sh
Special Shell Commands (in Terminal Mode)
These shell commands date back to the original "Bourne Shell". The "sh" nickname is probably simply the first 2 letters of the word "shell".
I normally store these shell commands in the "/home/pi" folder which is where the Terminal window is opened in. These commands
can be immediately run once the Terminal window is opened. It is often important to know the exact environment that the user is operating
in. The first 4 shell commands provide the IP Address, the Model of the Raspberry Pi computer, the Serial Number of the Raspberry Pi
computer and the label on the micro SD card that contained the Raspberry Operating System. The full date and time can be seen by simply
entering "date" in the Terminal window.
Command to print the IP address of a Raspberry Pi
#!/bin/bash
# /IP.sh as of 2022BFeb04 by D@CC
# use grep to save text up to " "
hostname -I |grep -o '^[^ ]*'
# displays the current IP address
# must follow by >$sudo chmod +x IP.sh
#         run by >$sh IP.sh
# end
Command to print the Model of a Raspberry Pi
The model of each Raspberry Pi computer distinguishes the various models that exist as of 2022. They
are Pi 2, Pi 3, Pi 4, Pi Zero, Pi zero 2 W and the Pi 400.
#!/bin/bash
# /Model.sh as of 2022BFeb03 by D@CC
cd /proc
grep Model cpuinfo
# displays the Pi Model
# must follow by >$sudo chmod +x Model.sh
#         run by >$sh Model.sh
# end
Command to print the Serial Number of a Raspberry Pi
#!/bin/bash
# /Serial.sh as of 2022BFeb03 by D@CC
cd /proc
grep Serial cpuinfo
# displays the Pi Serial Number
# must follow by >$sudo chmod +x Serial.sh
#         run by >$sh Serial.sh
# end
Command to print the SDLabel of the (OS) micro SDcard
Remember to create a text file named Desktop/SDLabel.txt . It must contain
the name of the micro SDcard: eg "_Fla56S032G" without double quotes nor CRLF.
[I still do not know how to read the micro SDcard plugged into the Maker Pi Pico board.]
#!/bin/bash
# /SDLabel.sh as of 2022BFeb04 by D@CC
more /home/pi/Desktop/SDLabel.txt
# displays the SDLabel Number
# must follow by >$sudo chmod +x SDLabel.sh
#         run by >$sh SDLabel.sh
# end
Command to print the WiFi Mnemonic of the Router
Remember to create a text file named Desktop/Router.txt . It must contain
the RouterName and the WiFiMnemonic.
#!/bin/bash
# /Router.sh as of 2022BFeb05 by D@CC
grep WiFiMnemonic /home/pi/Desktop/Router.txt
# displays the WiFiMnemonic
# must follow by >$sudo chmod +x Router.sh
#         run by >$sh Router.sh
# end
On a Raspberry Pi computer, the usage statistics of the WiFi router can be displayed using the StationDump.sh command shown below;
#!/bin/bash
# /StationDump.sh as of 2022BFeb12 by D@CC
iw dev wlan0 station dump
# displays the wlan0 statistics
# must follow by >$sudo chmod +x StationDump.sh
#         run by >$sh StationDump.sh
# end
Its produces a typical statistics dump below:
Station ##.##.##.##.##.##.## (on wlan0)
	inactive time:	0 ms
	rx bytes:	125251683
	rx packets:	124725
	tx bytes:	5657071
	tx packets:	40802
	tx failed:	3
	signal:  	-38 dBm
	tx bitrate:	11.0 MBit/s
	rx bitrate:	72.2 MBit/s
	authorized:	yes
	authenticated:	yes
	associated:	yes
	WMM/WME:	yes
	TDLS peer:	yes
	DTIM period:	1
	beacon interval:100
	short slot time:yes
	connected time:	73932 seconds
Command to print the Available Space on the System Volume
#!/bin/bash
# /Available.sh as of 2022BFeb05 by D@CC
df -h | grep /dev/root
# displays the Available space on sys volume
# must follow by >$sudo chmod +x Available.sh
#         run by >$sh Available.sh
# end
Command to set the timezone
This command reads the timezone from the Desktop/timezone.txt file.
Normally it should contain the text "timezone America/Toronto"
#!/bin/bash
# /Timezone.sh as of 2022BFeb06 by D@CC
# sudo timedatectl set-timezone < grep Timezone    /home/pi/Desktop/Timezone.txt
sudo timedatectl set-timezone America/Toronto
# sets the current timezone to Toronto (or in future the value in Timezone.txt)
date
# display the Date, Time and TimeZone
# must follow by >$sudo chmod +x Timezone.sh
#         run by >$sh Timezone.sh
# end
Command to display the Geographic location of the IP address
Recently, the proffered command did NOT function correctly.
Hopefully, the following command installs the required database.
sudo apt-get install geoip-bin
But it doesn't work, so . . . . .
Common Default Router IPv4:  192.168.1.1  (maybe)
External IPv4 : 64.32.162.150
from:  What Is My IP  shows your external IP address (as My Public IPv4), Use Ctrl+c to copy it

from:  iplocation.net  type in (or paste using Ctrl+v) your external IP address,  then click on the IP Lookup button
Geolocation data from IP2Location
Country                    State       City
United States of America   Florida     Bradenton

                                      Latitude	Longitude
                                      27.4989	-82.5748
Try the Netflow Analyzer:
https://www.manageengine.com/products/netflow/download.html Too complex
lansweeper.com
https://content.lansweeper.com/ip-scanner?utm_source=google&utm_medium=cpc&utm_campaign=IT_Asset_Management&utm_term=IP_Scanner&utm_term=how%20to%20find%20devices%20on%20my%20network&utm_campaign=%5BAM%5D+Search+%7C+IT+Asset+Management+%7C+UT&utm_source=adwords&utm_medium=ppc&hsa_acc=4846545452&hsa_cam=13032130731&hsa_grp=120879996686&hsa_ad=532170906172&hsa_src=g&hsa_tgt=kwd-339972723036&hsa_kw=how%20to%20find%20devices%20on%20my%20network&hsa_mt=b&hsa_net=adwords&hsa_ver=3&gclid=Cj0KCQiAr5iQBhCsARIsAPcwROMlrRMeBfhm8FgQo_2HaD8GRJKgkYvyTMOuPT6-1Irv4t5nLLwO--MaApe2EALw_wcB No Need to Install
Raspberry Lan router statistics
>$ iw dev wlan0 station dump
Command to print the major Environment parameters of the PC
The following Environ.sh command will print the Date&Time, the SDLabel, Pi Model, Pi SerialNumber, IP address, the WiFiMnemonic and
the accessories noted by the user. These accessories should be listed in the Desktop/Accessories.txt file. Such accessories
would include GPIO : PiR2C or USB : Pico w MakerPiPico board for example. Another might be GPIO :Maker pHAT or
GPIO : weatherHAT . The names of such accessories have not yet been standardized. The format of the Accessories.txt
file is proffered by the author. Such an accessories list nor an Environ list has not yet been defined anywhere. A list of
many of the commercially avaiable boards for the Raspberry Pi GPIO bus can be seen in Source 04 at the end of this article.
It should also include "Alarm : on-screen" or "Audio :headphones" and "Audio :Blue-Tooth".
#!/bin/bash
# /Environ.sh as of 2022BFeb22 by D@CC
more /home/pi/Desktop/Timezone.txt
sudo timedatectl set-timezone America/Toronto
date
#                                           date & time
echo "on Pi Zero (non-W), the OS estimates the best date/time doh!"
more /home/pi/Desktop/SDLabel.txt
# displays the                              SDLabel Number
cat /etc/os-release | grep PRETTY
# displays                                  OS Name (eg buster)
df -h | grep /dev/root
# displays the Available space on sys       Available
free -h
# display the Available RAM                 Memory
grep Model /proc/cpuinfo
# displays the                              Pi Model
echo "Overscan                    : Disable  on  Zero 2 is best"
# remove                      1/2 " black border
grep Serial /proc/cpuinfo
# displays the                              Pi Serial Number
echo "Web access ONLY if an IP address appears below"
hostname -I |grep -o '^[^ ]*'
# displays the                              current IP address
grep WiFiMnemonic /home/pi/Desktop/Router.txt
# displays the                              WiFiMnemonic
echo "Interfaces:"
ls /dev/gpio* /dev/i2c* /dev/spi*
# should return                             "/dev/gpiochip0 /dev/i2c-1" etc
more /home/pi/Desktop/Accessories.txt
# display the                               Accessories  eg GPIO, USB
# must follow by >$sudo chmod +x Environ.sh
#         run by >$sh Environ.sh
# end
The author
has discovered that it is difficult to document or see the combination of software and equipment that are being used
each time a Raspberry device is started up. The author attempts to log each use of a new Raspberry Pi device
configuration by using the Terminal command shown below:
>$ sh Environ.sh >Desktop/Environ22B09.txt
where 22B09 indicates Feb 09 2022.
A typical output of the Environ.sh command is shown below:
zone          America/Toronto
Tue 22 Feb 2022 01:08:54 PM EST
on Pi Zero (non-W), the OS estimates the best date/time doh!
_Fla73S032G
PRETTY_NAME="Raspbian GNU/Linux 10 (buster)"
/dev/root        29G  6.3G   21G  24% /
              total        used        free      shared  buff/cache   available
Mem:          3.7Gi       767Mi       2.1Gi       197Mi       964Mi       2.7Gi
Swap:          99Mi          0B        99Mi
Model		: Raspberry Pi 400 Rev 1.0
Overscan                    : Disable  on  Zero 2 is best
Serial		: 1000000051b6d000
Web access ONLY if an IP address appears below
192.168.1.116
WiFiMnemonic       : classiccar925
Interfaces:
/dev/gpiochip0	/dev/gpiomem  /dev/spidev0.0
/dev/gpiochip1	/dev/i2c-1    /dev/spidev0.1
Accessories.txt:
AsOf               : 2022BFeb20
PiFont             : Monospace Regular 10
RDCMnemonic        : LydieArthur$
Printer            :xCanon MX520 series Printer WS
GPIO               : Maker pHAT,PiR2null
USB                : none
Pico Serial        : none
ALARM              : Visual:sxiv   Pictures/alarm.png
ALARM              : Audible:aplay Music/alarm.wav
AUDIO              : HDMI
Program1           : MakerpHATDemocode.py
Program2           : read_GPIO_D.py
Display Image on screen programmatically
WARNING: Routine sxiv (but not feh) has been tested.
You can achieve that using feh tool (also, you might have to install it (Source 11) using:)
Invoke it using:
>$ DISPLAY=:0 feh --geometry [W]x[H]+[XOffset]+[YOffset] -x filepath
where W and H are Width/Height of the window that will display the image respectively.
XOffset is the horizontal offset and YOffset is the vertical offset locations you want to display it at. (ex: 0,0 will be the first screen)
if you want the second screen then use first-screen-width,0 as x and y offsets.
What this will do, it will display an image at the selected display screen, and when you hit ctrl+c it will close it. But, what I would like to be able to do is to send a command to close the said image if it's possible. This was described at Source 10 below.
The application named sxiv was installed and tested on a Raspberry Pi as follows:
- created an image named alarm.png in /home/pi/Pictures/alarm.png
- used Add/Remove Software to install sxiv
- In terminal mode ran:
>$ sxiv /home/pi/Pictures/alarm.png
- it displayed the alarm image on the display monitor
For more help, use terminal and type:
>$ man sxiv"
Before sxiv is installed, its manual can be viewed at Source 17 below.
The alarm is terminated by clicking on the X in the top right corner of the alarm image or by typing the letter "Q". Watch Video Source 02 for more information about sxiv.
Use the following Terminal command to view thumbnails of all the images in the Raspberry folder Pictures:
>$ sxiv -ftr Pictures
Command to announce an Alarm
Before using the Alarm command, an alarm.png image must be loaded into the /home/pi/Pictures folder. Furthermore an alarm.wav must be loaded
into the /home/pi/Music folder. Then, into the Terminal window, type the command:
>$ sh Alarm.sh
After hearing the alarm sound and seeing the ALARM window, hit "Q" to terminate the alarm.
#!/bin/bash
# /Alarm.sh as of 2022BFeb10 by D@CC
aplay /home/pi/Music/alarm.wav
# sounds an alarm signal
sxiv /home/pi/Pictures/alarm.png
# displays the word "ALARM" in a window
# must follow by >$sudo chmod +x Router.sh
#         run by >$sh Router.sh
# end
The normal audible alarm is supplemented by a visual alarm because audible alarms cannot be heard when a Raspberry Pi
is operated in "headless" mode using RDC (Remote Desktop Connection) on a remote Laptop or PC. The sxiv visual alarm
is shown below:
Click on the photo to enlarge it.
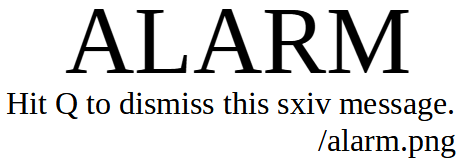
.visual alarm.png by D @ CC
Command to start the PiR2 logging system
The PiR2 logging system is used to monitor some ambient parameters in a living space. It is not yet fully implemented but is
described in more detail at Web Source 01.
#!/bin/bash
# /pir2.sh as of 2021GJul03 by D@CC
cd Desktop/PiR2
python3 python/pir2main.py
# runs the PiR2 controller system
# must follow by >$sudo chmod +x pir2.sh
#             run by >$sh pir2.sh
# end
Commands to update Raspberry Pi OS before doing anything
For more instructions and advice on system upgrades see Source 14.
>$ sudo apt update
>$ sudo apt dist-upgrade -y
>$ sudo apt clean
>$ sudo reboot
>$ sudo rpi-update
>$ sudo nano /etc/apt/sources.list
>$ sudo apt-get install feh
>$ sudo apt-get update
>$ sudo apt-get upgrade
Demo of the Maker pHAT using the Pi-400
Click on the photo to enlarge it.
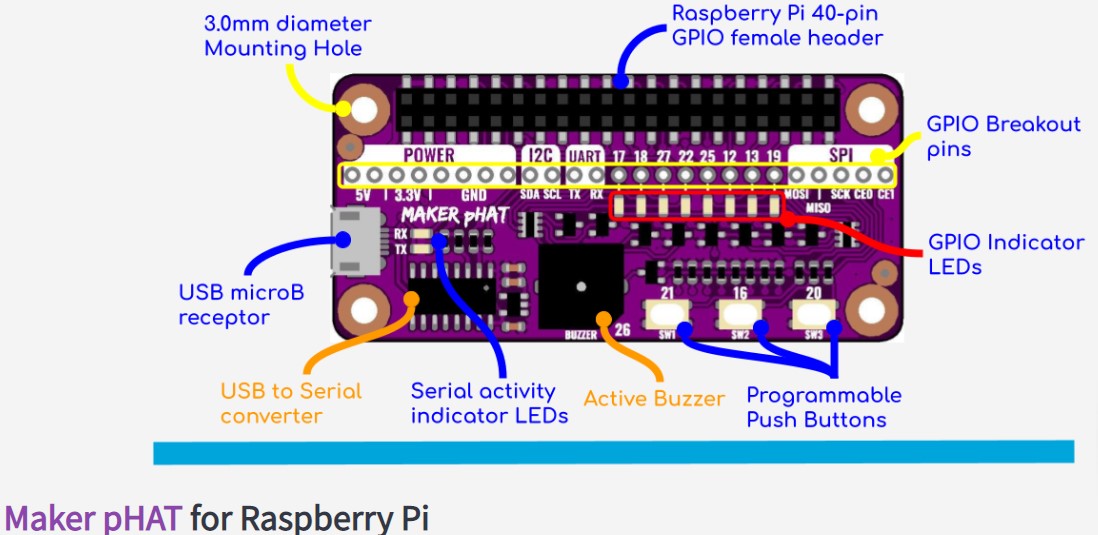
Maker pHAT by Cytron
The Maker pHAT User Manual gives the impression that the inexpensive US$10 Maker pHAT (shown above) is very complicated to use. This is not the case, especially if you have a
working Raspberry Pi, for example a Raspberry Pi-400 as shown in the image below:
Click on the photo to enlarge it.
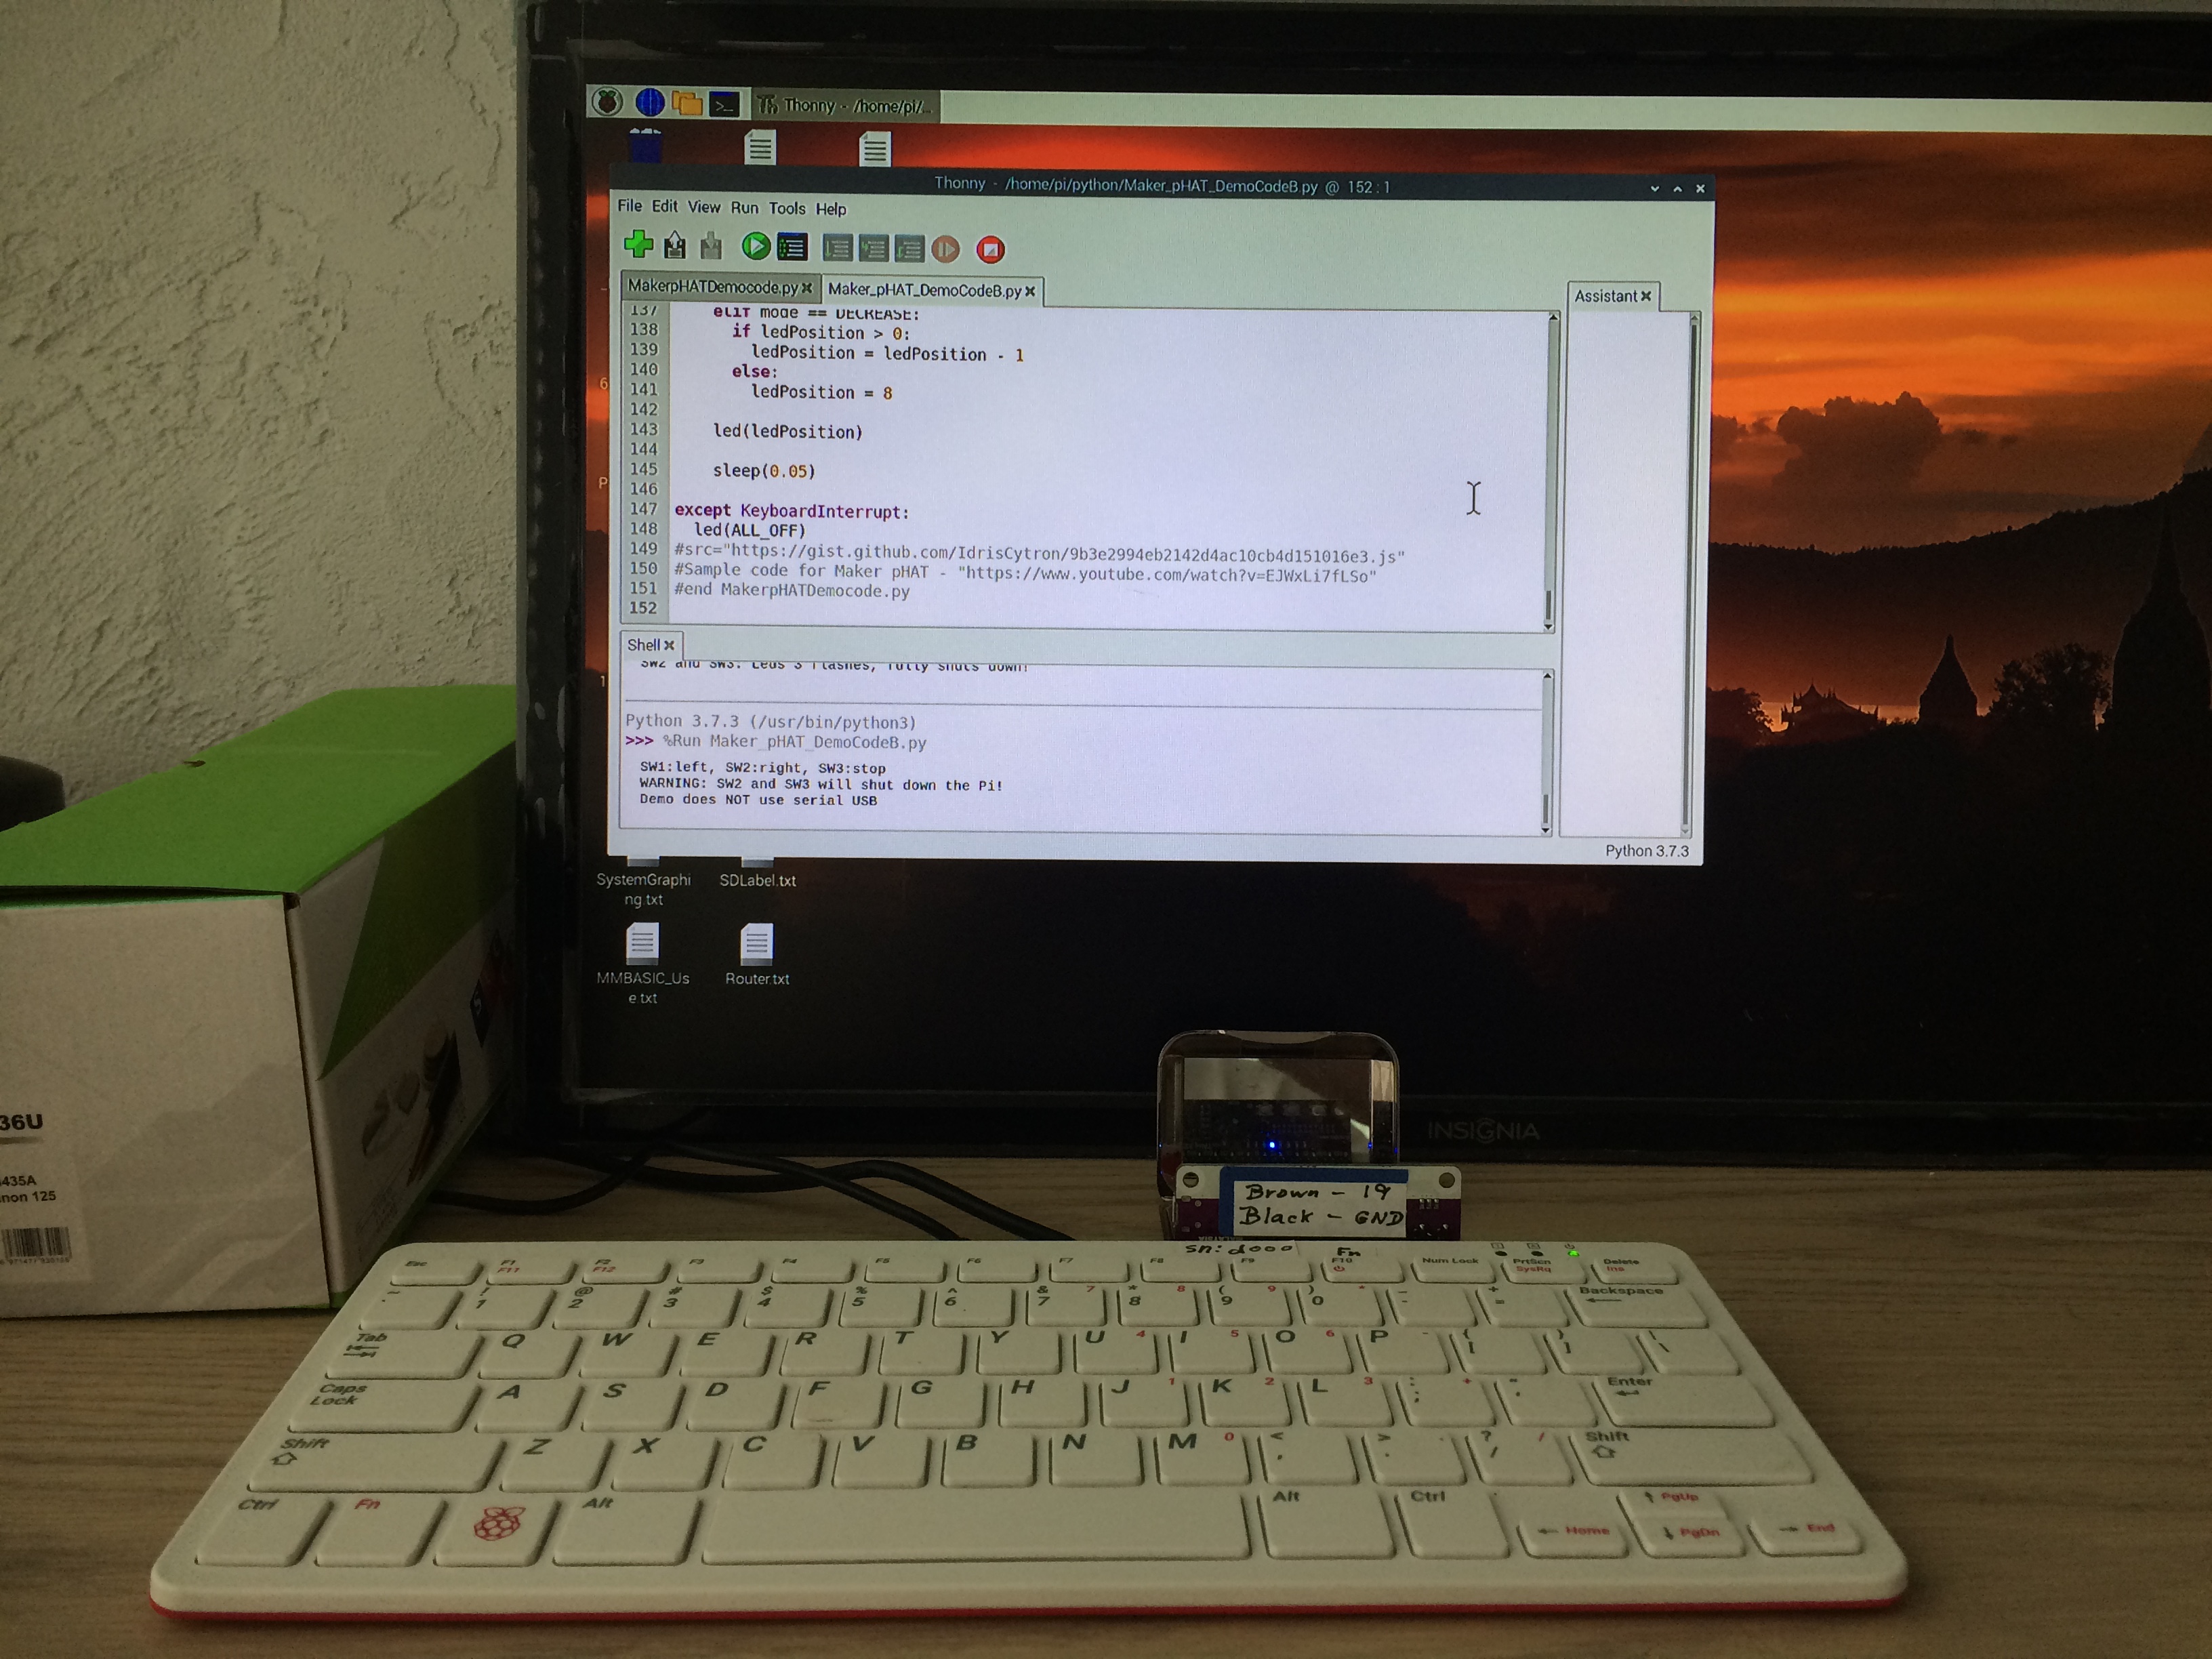
Raspberry Pi-400 demo of a Maker pHAT
Simply plug the Cytron Maker pHAT into the GPIO port of the Raspberry Pi. With a Pi-400, this is slightly complicated by the fact
that the GPIO pins don't protrude far enough from the case. I use a simple 40 pin M-F connector to extend the GPIO pins.
With a Pi-400, the LEDs aren't visible to the operator, so I position a tiny mirror behind the Maker pHAT. These 2 issues are
not encountered when using any other Raspberry Pi. By enlarging the above photo, one can see a single LED that is lit, on the back of
the Maker pHAT as seen in the mirror placed behind the Maker pHAT. [Disregard the label mentioning the brown and black wires.]
Of special interest is the USB micro-B receptor (labelled "USB microB receptor) connector. This micro-B connector accepts any USB serial signal. The serial signal on this USB micro-B
receptor is decoded by the on-board "USB to Serial converter" IC, the FT231X (CH340 driver in Source 28). Two tiiny leds (labelled RX and TX) show the activity on the
microB receptor. This micro-B socket can also be used to supply 5V to the Cytron Maker pHAT.
WARNING: It is very easy to misalign the 40 pin connector of the Maker pHAT with the GPIO pins. Be sure that no pins are
unconnected.
The User Manual for the Maker pHAT is available at Web Source 09 shown below. It contains a demo program named MakerpHATDemoCode.py
that is available at Web Source 07 below. My attempt to download it resulted in an "Internal Server Error". To resolve this, the same program is available
as a txt file named MakerpHATDemoCode_py.txt in WebSource 08 below. This can be easily downloaded and loaded into Thonny on any
Raspberry Pi computer such as the Pi-400. It can simply be renamed to MakerpHATDemoCode.py before loading into Thonny.
Pressing RUN will cause the demo to flash the leds and beep the buzzer on the Maker pHAT. The 3 switches cause the LEDs to blink left
or right or stop. Pressing switches 2 and 3 simultaneously will flash all the leds three times and beep, followed by an abrupt shut-down of the whole
Raspberry Pi. This is not an error situation. Note that the demo program makes no attempt to make use of the serial micro-USB connector
on the Maker pHAT.
I have previously used software called MMEdit to communicate with and control the Raspberry Pi Pico via its microUSB serial port connector.
When doing this, a
short cable connects the Pico's micro USB connector to a standard USB connector on the Raspberry Pi. MMEdit functions as an ultra-simple
VT100 terminal emulator. A VT100 communicates using a 2 way serial interface which contains simply a transmit (tx) and a receive (rx)
wire. This is exactly what is needed to communicate with the microUSB serial port connector on the Maker pHAT. The author intends
to create and test a small serial port demo program to demo the use of this connector on the Maker pHAT. This will necessitate the use of
2 computers: one running the MMedit program and a Raspberry Pi connected to the Maker pHAT. If one has a small asynchronous
serial terminal, it can be used to communicate with the Maker pHAT directly.
Remote Desktop Connection
The Remote Desktop Connection Windows 10 software is used to operate a computer that is remote to the computer that the operator is using.
It can be used to operate a distant computer that is also running Windows, but the distant user must pay an extra fee to make use of this service.
But the same Remote Desktop Connection software can be used to operate a LINUX (or Raspberry Pi) computer that is remote. The easiest way
to do this is when the operator's computer and the remote computer are both connected to the same router. This usually means that the
operator's computer and the LINUX (or Raspberry Pi) computers are both in the same house or apartment. The LINUX (or Raspberry) computer
must also install (and/or start up) a program called "xrdp".
When Remote Desktop Connection is started up by the Windows-10 operator, the IP
address of the LINUX (or Raspberry) computer must be entered. Then the user id and password of a valid user must also be provided. The
user id on a Raspberry computer is usually "pi". The initial password is "raspberry" which should have been reset to another value by
the owner of the Raspberry Pi computer. My favorite password is the first letters of the words in a poem known to me, followed by
the birth date(s) of my friends or ancestors followed by some control characters. My mnemonic for my RDP password is shown as
RDPMnemonic. This mnemonic is displayed as part of the environment using the Terminal command shown below:
>$ sh Environ.sh
Clone and Backup a Bootable SD Card in Windows
Web Source 02 explains how to use the free SD card copiers named AOMEI Backupper Standard (Web Source 03).
Unfortunately, AOMEI Backupper doesn't see an SDcard that is inserted into the Paviliondv7 laptop. So, instead
I use Win32 Disk Imager which can be installed by searching for it using Windows-10 bottom left search field.
Unfortunately, Win32 Disk Imager doesn't let me copy data from a 16 GB SDcard to a 32 GB SDcard. Doh?
50 Useful Linux Terminal Commands
See Web Video #1 for a 1.5 hour video describing these 50 commands.
Linux Commands 50
by Colt Steele
(time 1:28:00)

as of 2022AJan31

command  my description/comments
*******  ***********************************************
alias	show/creates command alias definitions
bg	move jobs to background
cat	concatenate files together
cd	change directory
chmod	? change mode of a file
chown	change owner of a file
clear	clear screen (terminal)
cp	cp --help  (copy file)
date	doh
df	disk free
diff	find differences between two files
du	disk usage by folder (byte count)
echo	print string to terminal
fg	move job to foreground (and make current)
find	find a file by full name
grep	find text within a file
gunzip	doh
gzip	doh
head	print first 10 lines of each file
history	of terminal commands
jobs	list of current batch jobs
kill	terminate a job
killall	!!!
less	edit a file
ln	create a link to ....
ls	list directory entries (e.g. ls -l)
man	view the manual   e.g. man pwd
mkdir	make a directory
mv	move a file
nano	start a tiny text editor
passwd	change password
ps	process status
pwd	print working directory
rm	remove a file
rmdir	remove an empty directory
sh	shell command (run)
sleep	sleep for n seconds
sort	sort from stdinput to stdoutput
su	switch user
sudo	execute command as special user
tail	print the last 10 lines of a file
tar	create/list a total archive
top	task statistics (^+C)
touch	create an empty file
tr	translate or delete characters
uniq	remove duplicate lines in a file
wc	word-count of a file
who	who is on-line
whoami  ASIS
xargs	run command with special args


Source: https://www.youtube.com/watch?v=ZtqBQ68cfJc
/LinuxCommands50.txt
Using Linux Terminal Commands on a Mac/Windows
It is a not a trivial task to create an empty text file on a Mac. But the following few steps will do it:
-start up the Finder app
-select the folder which will contain the new text file
-within the tootbar, find "Services"
    (on newer IOS as of 2022, "Services" can be ignored)
-Select the option that says "New Terminal at Folder"
-This will open a Terminal window pointing to the selected folder
-Enter "touch newfile.txt" to create the empty text file
-the file will be a text file even if the extensive of ".txt" is not part of the name
-to edit text in the new file, double click on the file name
-this will open the text file in a new window with a suitable text editor.
To do the same on a Windows-10 PC or laptop:
-In the bottom left corner, type "Terminal" where it says "Type here to search"
-a Command Prompt window will appear
-type "cd folder" to navigate to the folder that will contain the new text tile
     eg "cd Desktop"
-type "nul > newfile.txt" to create the empty text file
-ignore the "Access is denied" message.
-text "Exit" to exit from the "Command Prompt" window
-right-Click on the created file name and select open
-this will open the text file in a new window with a suitable text editor.
To do the same on the Raspberry Pi (Linux Terminal is not needed):
-in a File Manager window, navigate to the folder that will contain the new text tile
-right click and select "New File"
-Type in a name for the new text file and click on the OK button
    eg "test77.txt"
    an empty text file will be created.
-right click the file name and select "Text Editor"
-this will open the text file in a new window with a suitable text editor.
Raspberry GPIO Pin Usage by Add-On boards e.g. HATs
Web Source 04 lists the GPIO pin usage by many add-on boards designed for use on the Raspberry Pi GPIO bus.
It also provides a comprehensive index to the many commercially-available Raspberry Pi add-on boards (and
their manufacturers).
Printing to a networked printer (on a router) from a Raspberry Pi
There is an article in Source 12 that describes how a Raspberry user was able to
print to a networked printer. A program had to be written but eventually the
networked printer appeared in the list of printers on the Raspberry Pi. OS version buster didn't find my networked printer but OS version bullseye found it.
Creating the "first" Raspberry microSDcard using only an Ethernet cable
In Feb 2022, the author discovered a recent post that explains how a new owner of a Pi-400 can start with a blank microSDcard, flash it
with the full Raspberry Operating System and start up the Pi-400 using the new non-blank microSDcard. In the near future, this will
be possible with every Raspberry computer that is shipped. Until then, it is necesssary to modify the "boot" information that comes
burnt into the EPROM that is in the Raspberry computer. Sources 19 and 20 explain how to do all of this. Read Source 20 first. It is all quite easy.
The first step (loading a modified boot loader into the EPROM on the Raspberry board). This step only needs to be once, per Raspberry board.
Jeff Geerling explains this in Video Source 3. Note this only works for the Pi400 and the Pi-4 because other versions of the Raspberry Pi don't have
write-able eproms. Jeff pre-formatted his SDcard using Fat32. This process does need an Ethernet cable instead of WiFi. Once this method
is out of beta, all new Raspberry Pis will be shipped with this feature in the ROM code that comes with the Pi.
Thonny Python Package Library
I have needed to house my Python functions external to the main Python application program. Years ago, when I was using
MicroPython I found that external functions could be accessed using an "import" statement. The external functions could be accessed
if they were simply placed in the same directory as the main Python application program that called them. This no longer worked
when I began to use Thonny Python. Today, 2022BFeb24, I have successfully imported and accessed an external Python function that I created named show2(). It was easily done using these steps:
- created an IX folder anywhere
- into the folder I added the following 2 files:
     __init__.py   (this file can be an empty text file)
     Raspberry.py  (by renaming Source 23 from Raspberry_py.txt)
- Changed Thonny by telling it to add "Tools" to its main menu (Source 26)
- Restarted Thonny
- clicked on Tools on the main Thonny top menu
- clicked on "Manage Packages"
- clicked on "Target: user site packages"
- clicked on "/home/pi/.local/lib/python3.7/site-packages
    (Note that this folder is not visible as a normal folder using file manager)
- copy and paste folder IX and its contents into the window that opened
- close the windows until Thonny closes completely
- restart Thonny
- open "IXsample.py" (by renaming Source 24 from IXsample_py.txt)
- click on the round green "Run" button
- the IXsample.py program will print:

   These are the available models for Raspberry
         Pi
         Pico
         Generic
         Other
   str1: abcd int2:1
         abcd  1
   end of show2
   none
   exit IXsample.py
This shows that the external function named show2 was successfully run from the IX library by Thonny. More complete documentation is
available at Source 25. Note the library name "IX" originated hand writing IX tightly together. The "IX" then resembles the initials of David Cole: DC. More functions to be added to the IX library are described in Article 155 (Source 27).
Beware: Each Thonny Package can probably only be used with one application (the one that it was defined for).
This means that each application must have its own copy of a package. This can simply be accomplished by
creating a new directory and putting a duplicate copy of the package in it. If an application is moved from
one folder to another, it cannot use the old package that it was married to. To make matters worse, Thonny
does not easily show the folder name containing the application nor the folder name of the application that the package
was created for. Furthermore, there is no way to tell
Thonny to forget (erase the record saying) which application a package was built for. Perhaps a complete re-installation of
Thonny might be the only solution. Hopefully, this will be resolved in a future version of Thonny.
My solution is to use a unique folder name to house the application, and the same unique name to house the package under Thonny.
I was not able to directly edit the routine that I had transferred to the "package directory". Any such edits were ignored. I also found
that I needed to change the name of the app when I editted a package routine. I also changed the folder name containing the app
and changed the folder (name of package). This worked fine. I was also able to edit the app and run (test) the editted app without
changing the names of the 2 folders. By following these guidelines to the letter, the Thonny package library now seems to be usable.
Be sure to COPY (i.e. NOT MOVE) routines to the package. If you accidentally move the routine, it will be gone and it will not be possible
to edit them in their original folder next time the routine needs to be changed.
Source 28 is a github article describing the CH340/341 UART driver for the Raspberry Pi and for the esp8266-based dev boards (also often referred to as NodeMCU).
The Maker schematic uses a FT231XS which is a variant of the CH340/341. Jumpers JP7 and JP8 connect the USB RX and TX to the RPi RX and TX. These 2 jumpers are
labelled as "RX" and "TX" to the left of the "5V" jumper on the right side of the back of the Maker pHAT RPi board. All 3 of these jumpers (appearing to the right of the letters
"belongs to") are closed on the boards shipped from Cytron. For an image of the back side the the RPi Maker pHAT, see Source 09. Of the many Maker pHAT boards,
the RPi Maker pHAT was the first and is sold as "the Maker pHAT" board.
Raspberry Pi Benchmarks and Temperatures (non-Compute Modules)
The Raspberry Pi Model 4 is approximately 10 times as fast as the slowest Raspberry Pi Zero. The Pi400 has a very good
heat-sink and will not overheat unless it is overclocked. When comparing various models of the Raspberry Pi, Source 29
by CWD Aikon is the easiest way a user can compare processing speeds and device IO speeds of different
configurations on different Raspberry Operating Systems.
Source 29 contains results of the AikonCWD v3.0 benchmark on a Pi400 on 2023GJul22. Source 29 also lists the single line
Terminal command used to run the AikonCWD benchmark. The AikonCWD benchmark program also reports the
temperature of the CPU during the running of the benchmark.
Not needing any downloads, the simple Terminal command to run the AikonCWD benchmark is:
>$ curl -L http://bit.ly/1Vm2eHP | sudo bash
A full set of results for the AikonCWD benchmark can be seen at Source 32. A summary of one set of AikonCWD benchmark results is:
	Results:   2023GJul22 on Pi400:e46e OS:64-bit Bullseye on uSD card
	Internet P|D|U: 35.5ms|62.1Mbit/s|31.1Mbit/s
	CPU:       10.0  s
	Threads:   10.0  s
	Mem:        0.43 s
	HDPARM r:  42.13 MB/s
	DD WRITE:  12.8  MB/s
	DD READ:   43.4  MB/s
The CPU temperature (on a Pi Zero 2W) ranged from 33.1 C to 44.8 C during the AikonCWD benchmark.
Source 30 by
Nick Heath at TechRepublic cites the results (some shown in the graph below) of many different Benchmark programs including a Whetstone comparison. Whetstone results can even be used
to compare small computers with supercomputers. Whetstone benchmarks compare the speed of Floating Point
hardware/software in computers. The graphs by Nick Heath in Source 30 are very interesting (as seen in the example below). Not shown below, the more recent Raspberry Pi Zero 2W has speeds similar to the Raspberry Pi Model 3 B but is slower than the Raspberry Pi Model 3 A+ or 3 B+ boards.
Click on the photo to enlarge it.
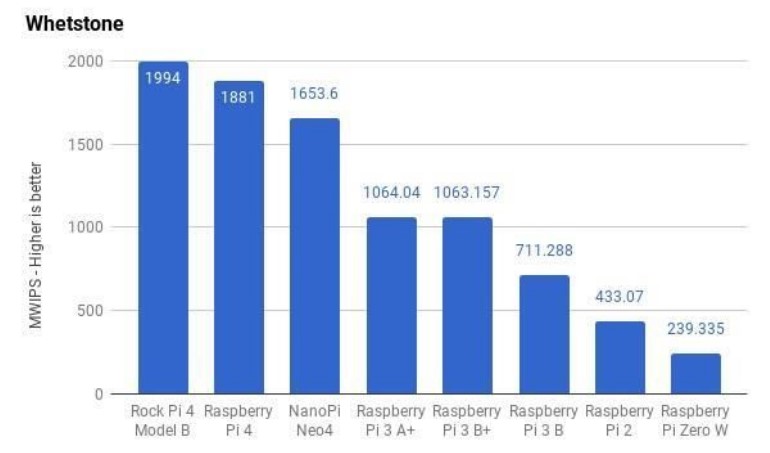
RPI Whetstones c2019
LinPack is another Benchmark program set. Some LinPack benchmarks for the Raspberry Pi are displayed in the image below. See Source 31 (MagPi issue 83) p32 "Benchmarking Raspberry Pi 4" for more information.
Click on the photo to enlarge it.
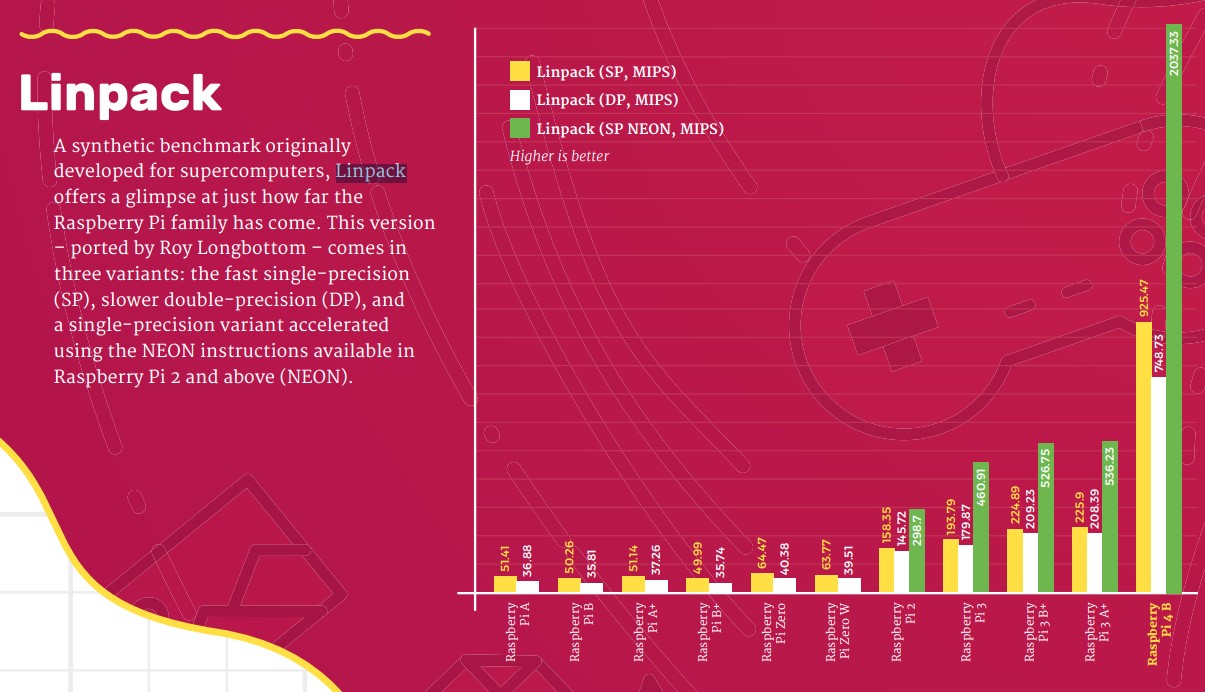
Linpack Magpi83 p32
Raspberry Pi Issues ( RPi Issues )
Click on the photo to enlarge it.
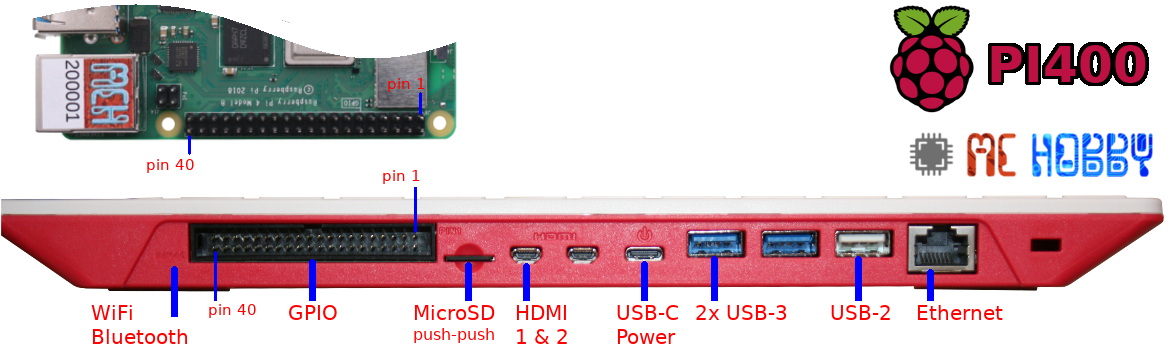
Raspberry Pi400 connectors (back view)
Kensington Lock ^
Major Raspberry Pi Issues ( RPi Issues )
-
- For Pi400, the TaskBar settings (right-mouse-click on TaskBar) should be:
Panel Appearance (Appearance Settings); Default; for Medium Screens; Set Defaults
with the single HDMI cable into the HDMI-1 Connector (closest to uSD card)
-
- If Raspberry logo is not in top left corner of taskbar (or if no taskbar is seen).
Fix 1: plug the single HDMI cable into the other (HDMI-1 or HDMI-2) connector.
or
Fix 2: Right Mouse Click on taskbar then: Panel Appearances:
select the other Location HDMI (1 or 2)
then plug the single HDMI cable into the other (HDMI-1 or HDMI-2).
If the resolution of the monitor is too low see "too big" below
if the Raspberry logo is not in top left ...
Right Mouse Click on Desktop, then Taskbar-location,
then select HDMI-1 or HDMI-2
(The task bar can only appear on 1 monitor at a time)
-
- If the Desktop folders are way too big or way too small.
Fix: for Pi400 Desktop setting (right-mouse-click on Desktop)
then: select Desktop (Appearance Settings); System : Font: PibotoLt Regular
then: select Size 12
-
- No available USB port (on a Pi Zero) to plug in a keyboard
Fix 1: Use a USB expander
Fix 2: Use a Bluetooth keyboard
Fix 3: Use an on-screen keyboard ( e.g. Onboard keyboard)
Fix 4: Use RDP (Remote Desktop Connection)
-
- Issues with the Anker BlueTooth device
See Source 33: Article 157 Instruction Manuals
In that article, see Anker . . . Recent Notes by D@CC
-
- Issues with RPi Linux Commands
See Source 34: Article 204 IT: Python Coding Course (204.html)
-
-cannot pipe/send CLI output into the paste buffer
a) Install xsel using Raspberry Pi Add Software
b) Pipe output to "xsel" with "-b"
eg dir PiR2F.txt | xsel -b (b means buffer)
c) Paste using ctrl-shift-v
eg more ctrl-shift-v
displays the CLI :
more PiR2F.txt
d) Hit Enter
will list the file
Issues / Questions / Answers at stackoverflow
There is a guru website named "stackoverflow.com" that answers myriad technical computer questions in detail. If you know the exact "stackoverflow" reference number (below), just google it (e.g. "stack 4842424") to get the detailed answer.
stackoverflow #		QUESTION				SHORT ANSWER

stack 292095		? python: poll the Keyboard		ctypes.CDLL()
stack 4842424		? ESC[96m				ANSI Color Escape sequences
stack 5130968		? CLI copy into paste buffer		xsel
stack 6179537		? python wait n secs for input		inputWto()
stack 9437726		? python get value of var. from name	eval()
stack 22058048		? python: file's hash total 		hashlib.md5()
stack 32367619		? i2s pcm audio	data			Adafruit I2S MEMS Mic
Comparing Two Files
A user often wishes to compare two files. Sometimes this is to know the differences between two sets of code for two similar programs or between two versions of a program. Other times it is to know the differences between two data files or logs. A common Linux tool is "diff" which is used on a Terminal command line. A very good GUI tool is "meld" that is described in Article 187. "Meld" works on a Raspberry Pi and probably under Windows. If two files might be identical but are too long to compare visually, the md5_IX hash program (see Article 206) might be useful. All three work on a Raspberry Pi.
Related Thoughts
See Source 35 for a comparison of Engine Code Scanners (OBD-II) costing between $30 and $99.
End of Article (Sources follow)
This article, by D@CC is of course, a work-in-progress as of 2023HAug23.
External Sources
Video Sources
Video Source V170:01:www  50 Most Popular Linux Commands
( 1:28:00 hrs) by Colt Steele in Dec 2021
50 Most Popular Linux Commands
( 1:28:00 hrs) by Colt Steele in Dec 2021
Video Source V170:02:www
SXIV Image Viewer
( 11:22 mins) by Luke Smith in 2019)
Video Source V170:03:www
Pi400 or Pi 4 will install itself
(9:42 mins) by Jeff Geerling on 2022 Feb 16
Web Sources
Web Source S170:01:www  Pi: PiR2A Area Controller Prototype (139.html)
by David KC COLE on 2020 E May 03
Pi: PiR2A Area Controller Prototype (139.html)
by David KC COLE on 2020 E May 03
Web Source S170:02:www
Whu Clone Bootable SD Card in Windows?
by Ivy on 2021 L Dec 13
Web Source S170:03:www  AOMEI Backupper Freeware (Standard Edition 6.8.0)
by AOMEI on Dec 16, 2021
AOMEI Backupper Freeware (Standard Edition 6.8.0)
by AOMEI on Dec 16, 2021
Web Source S170:04:www
Raspberry Pi GPIO pinouts for many add-on boards e.g. HAT
pinout.xyz/boards by @Gadgetoid on Feb 06, 2022
Web Source S170:05:www
Cytron's Raspberry Pi Maker pHAT review (Click on "Read More")
by MagPi on Feb 06, 2022
Web Source S170:06:www
Cytron's Raspberry Pi Maker pHAT review (Click on "Read More")
by MagPi on Feb 06, 2022
Web Source S170:07:www  Cytron's Maker pHAT Demo Code (python)
by Cytron Feb, 2019
Cytron's Maker pHAT Demo Code (python)
by Cytron Feb, 2019
Web Source S170:08:www  Cytron's Maker pHAT Demo Code (python txt)
by Cytron Feb, 2019
Cytron's Maker pHAT Demo Code (python txt)
by Cytron Feb, 2019
Web Source S170:09:www  Cytron's Maker pHAT User's Manual (30 page Google Document)
by Cytron Feb, 2019
Cytron's Maker pHAT User's Manual (30 page Google Document)
by Cytron Feb, 2019
Web Source S170:10:www
Pi4: Display iimage on screen programatically
by mohyddin on Nov 22 2019
Web Source S170:11:www
UBUNTU: Install feh
by ZoomAdmin . . . seen in 2022
Web Source S170:12:www
Enable Raspberry Pi to Print to Networked Printers
by mirz irwan osman . . . seen in 2022
Web Source S170:13:www  Download for Enable Raspberry Pi to Print to Networked Printers by mirz irwan osman . . . seen in 2022
Web Source S170:14:www
How To Update Raspberry Pi: Just . . . . by James J Davis on Dec 10 2020
Web Source S170:15:www  (audible) alarm.wav by David COLE on Feb 10 2022
Web Source S170:16:www  (visual) alarm.png by David COLE on Feb 10 2022
Web Source S170:17:www
sxiv . . . fast by Hund on 2018 D Apr 12
Web Source S170:18:www  sxiv manual written by Bert Muennich as early as 2014
Web Source S170:19:www
The New Raspberry Pi Imager (Can run on Windows 10) by Gordon Hollingworth of RaspberryPi.com on 2020 C Mar 05
[Copies a Raspberry Image to a microSDcard]
[Also can be used to do a [one-time] copy of a new Raspberry BootLoader to an RPi's EPROM via a empty microSDcard]
Web Source S170:20:www
GREAT NEWS: Network Raspberry Install beta test: help required written by Peter Harper of RaspberryPi.com on 2022 B Feb 08
[WOW: How to copy a Raspberry Image to the empty microSDcard in a Pi-400 directly using an ethernet cable.]
Web Source S170:21:www
IT: Flash Drive & Device Library (167.html) created on 2022 B Feb 22 by David KC Cole
[List of SN of my RPi computers, microcomputers, SDcards, dongles etc]
Web Source S170:22:www
Pi: Other Related Raspberry Pi Information (169.html) created on 2022 B Feb 22 by David KC Cole
[Lists many 3D objects of interest to me]
Web Source S170:23:www
Raspberry_py.txt [defining show2(str1,int1)] created on 2022 B Feb 24 by David KC Cole
[my first working Thonny Package function definition: show2.py]
[Lists many 3D cases of interest to me]
Web Source S170:24:www
IXsample_py.txt [invoking show2(str1,int1)] created on 2022 B Feb 24 by David KC Cole
[my first use of my Thonny Package function: show2.py]
Web Source S170:25:www
PythonPackageCreation.txt created on 2022 B Feb 24 by David KC Cole
[describes my very first Thonny Package creation.]
Web Source S170:26:www
Tools on menu bar created on 2020 A Jan 18 by BazzF
[Install the regular Thonny menu bar, including Tools.]
Web Source S170:27:www
Pi: ix_all Library (My Python Functions) (155.html) created on 2021 B Feb 20 by David KC Cole
Web Source S170:28:www
Pi: CH340/341 UART Driver for Raspberry Pi by aperepel at github on 2016 May 20
Web Source S170:29:www
Raspberry Pi AikonCWD Benchmark v 3o0 by CWD Aiken before 2023
Web Source S170:30:www
Raspberry Pi 4 Model B review by Nick Heath at TechRepublic on 2019FJun23
Web Source S170:31:www
Raspberry Pi Magpi Issue 83 by Raspberry Pi on 2019GJul
Web Source S170:32:www
Full results of 1 run of AikonCWD by D@CC on 2023FJun14
Web Source S170:33:www
Misc: Instruction Manuals (157.html) created by David KC Cole on 2021 B Feb 22
Web Source S170:34:www
IT: Python Coding Course (204.html) created by David KC Cole on 2023 F Jun 12
Web Source S170:35:www
Best OBD-II Scanners for 2023 by Car and Driver before 2023 J Oct 18
WebMaster: Ye Old King Cole
Date Written: 2022 B Feb 04
Last Updated: 2023 J Oct 18
Backed Up On: 2022 B Feb 25 as 170_2022BFeb25.html
(c) ICH180RR Corp.
/170.html