222 Misc: NVMe M2 Hats and SSDs (222.html)

Keywords

NVMe M2 PCIe SSD "NVMe Base for RPi" "RPi 5B" Raspberry "M.2 HAT+" HAT SSD PineBerry PineBoards SeeedStudio "Dual M.2 HAT" "external power" cooling "Pogo Pin" "speed test" "External Power" 5v LibreOffice DeepSeek "Pogo Post" FFC "Raspberry 5"

/KeywordsEnd

(To enlarge .....Click it)

thumb: IXimage.jpg
IX or (IX by DC) or "|><"


This article is by David Cole who created the IX family of software.

Introduction

When the Raspberry Pi 5 was first released, its new PCIe connector was not usable. It was known that mainly NVMe M.2 SSD drives were intended to use the connector. A company named PineBerry soon released a HAT board that permitted SSD drives to be used by the RPi 5B. Within months, PineBerry changed its name to PineBoards, then Raspberry released its own HAT, soon after that the PineBoards company just vanished. Within the first year of the release of the RPi 5, at least six companies, including Raspberry itself, released similar but slightly different HATs to do the same job. The author purchased many of these different HATs and has successfully run RPi 5 computers with Operating Systems residing on SSDs using many of these HATs. Source 02 describes how the author implemented a HAT manufactured by Raspberry. A very advanced HAT has been released recently (as of 2025Cmar10), by SeeedStudio. It permits 2 SSD drives to be simultaneously attached to an RPi 5. This HAT needs a special container (case) that is not sold by SeeedStudio. Instead a design for a 3D Printed case (Source 03) is provided. The author thanks Myrle Asper for printing one of these cases and giving it to the author as of 2025Cmar21. The author has evaluated it at the end of this article. The author recently asked the DeepSeek AI assistant to write an article describing many of these HATs that are currently available. With some coaxing by the author, the web page in Source 04 was produced by DeepSeek, including images of various HATs.

As with many hardware/software installations, issues arise that must be addressed. Hopefully this article and its sources will help future users resolve some of these issues.

Recommended HAT: "NVMe Base for RPI5"

(To enlarge .....Click it)

thumb: NVMeHATsForRaspberryPi5_verB1_html_c4eaa9876d3f0362.png
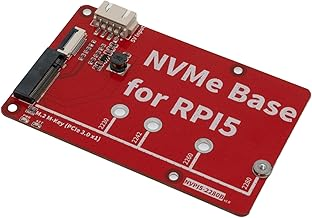
NVMe Base for RPi


The author favors and recommends the "NVMe Base for RPI5" HAT. It is very inexpensive, available from TEMU, houses all formats of NVMe SSD drives, can be mounted above or below the RPi 5, and has a connector that optionally accepts external Power (or via the GPIO pins) or not. It should be mounted below the RPi 5 because when mounted above the RPi 5, it limits cooling of the RPi 5 and obstructs all the GPIO pins. It is sold as SKU NVPI5-2280B. A smaller version is SKU NVPI5-2242T, but it does not accept the longer SD cards. The "NVMe Base for RPI5" HAT is delivered with a short 2-wire cable that connects to the 4-pin connector on the HAT. The other end of this cable can be plugged into an external Power source or even to the GPIO pins. If plugged into the GPIO pins, the red wire should be plugged into physical pin 4 and the black wire into physical pin 6 of the GPIO on the Raspberry Pi. This is best done if the HAT is mounted below the Raspberry Pi 5.

Project: Installing an SSD on a NVMe M.2 HAT on a Raspberry Pi 5B

(To enlarge .....Click it)

thumb: IMG_1518_RLeft.jpg
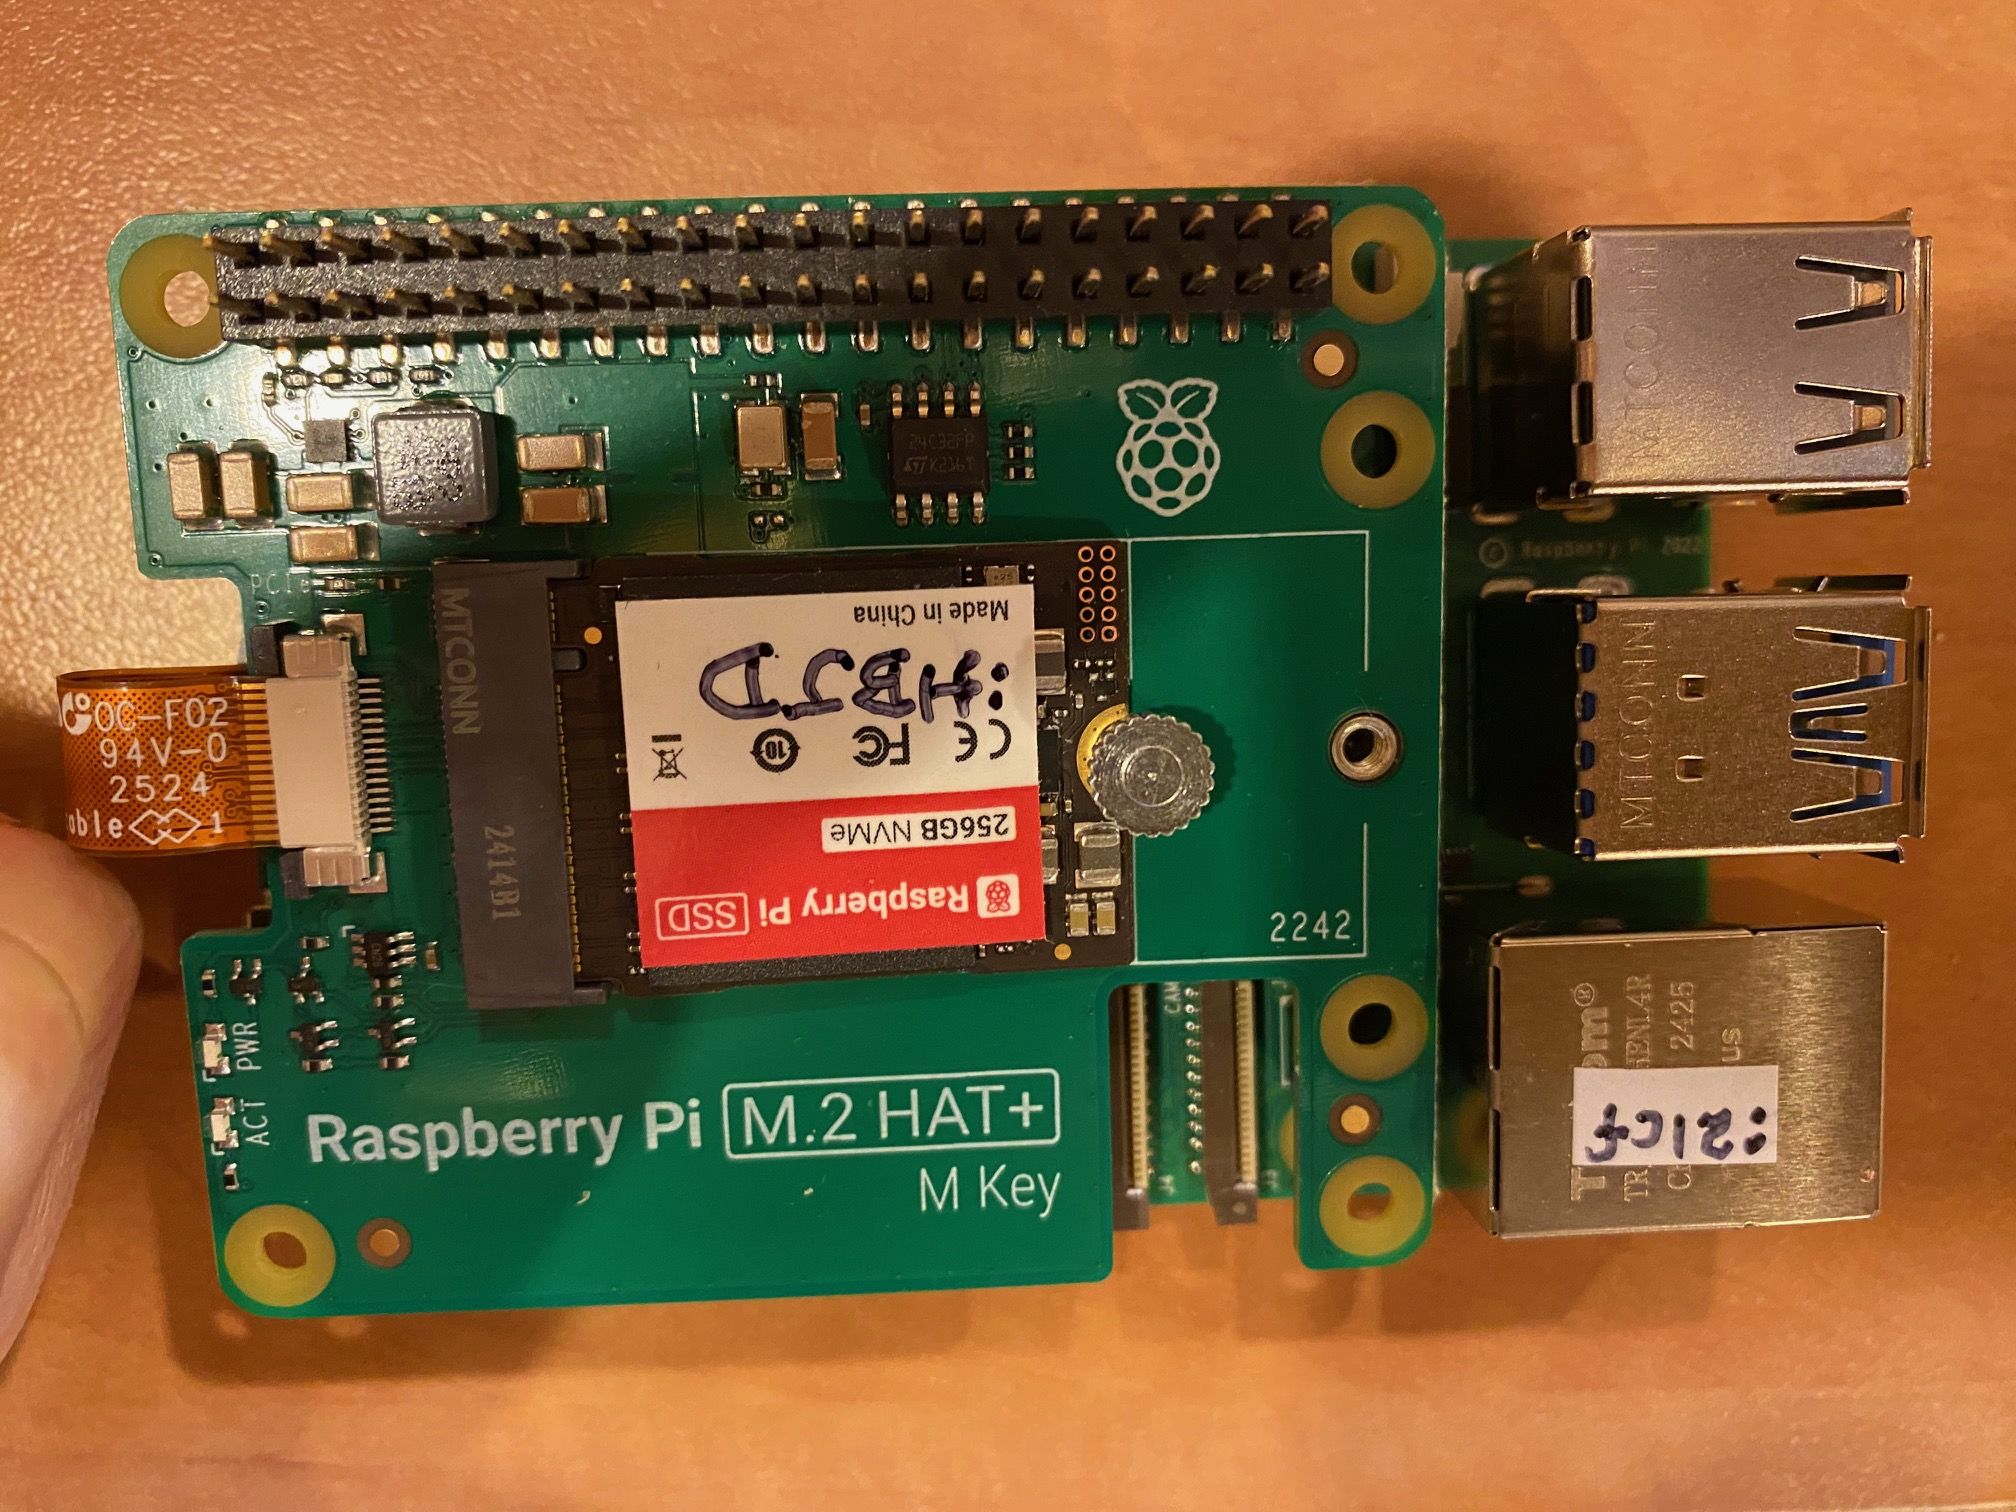
An SSD on a HAT attached to a Raspberry Pi 5B


Source 02 describes the materials needed and the steps taken by the author during this project. For this project, the HAT used, named M.2 HAT+, is manufactured and sold by the Raspberry company. Source 02 mentions a number of other Source documents, that have not yet been uploaded to the web. The author recently returned from a multi-month vacation. For medical reasons, this trip was interrupted, the author returned home prematurely, resulting in his main laptop being left stranded in Florida. During this time period, the author was not able to upload or change any web pages. As a result, some of these recent web pages will not be complete. The author has also been attempting to keep abreast of the evolution of Artificial Intelligence. Source 06 is a zipped collection of various images pertinent to this project. Readers can download this file collection and unzip it to view the images. The image above shows an SSD drive (labelled HBJD) mounted on the Raspberry M.2 HAT+ board which is mounted on a Raspberry Pi 5B (labelled 21cf). The HAT board is connected to the RPi 5B via the tiny orange flat ribbon FFC cable (on the left) that is actually manufactured as a printed circuit. Every HAT is delivered with a FFC cable to connect it the the PCIe connector on the Raspberry Pi 5B.

This novel printed circuit flat cable (shown on the extreme left in the above image) is a very important component. It conveys signals and power from the RPi 5 to the HAT. But the fine traces in this cable can only provide limited power. SSDs larger than 256GB will not receive enough power. To resolve this, external power must be made available from the GPIO pins, or using a "Pogo Post" or an external power connector. The different HATs from various manufacturers use all these techniques.

Another important issue is "cooling". Some HATs impede the air flow that cools the RPi 5. Furthermore, some of the larger SSDs themselves need additional cooling. Some HATs are positioned above the RPi 5 and some below. Those above interfere with cooling and limit access to the GPIO pins. Those located below the RPi 5 board limit access to the microSD card connector. Most HATs only provide space to mount one SSD. But SeeedStudio has recently (as of 2025Cmar14) released the "Dual M.2 HAT" that is designed to address most, if not all, of these issues. A photo of the SeeedStudio HAT can be found in Source 04. This HAT uses a "pogo pin" to draw power from the RPi 5 located above the HAT.

Important Typo:

The author encountered one typographical error that cost him at least an hour of wasted time on this project. The incident occurred after the SSD is physically installed on the HAT and attached to the Raspberry Pi 5 by the FFC cable. Raspberry's written documentation says that after booting up the Raspberry using the OS on the microSD card, two icons will appear on the desktop as shown below:

(To enlarge .....Click it)

thumb: IMG_1521.jpg
Two desktop icons indicating the presence of the SSD


The problem is that the two icons did not immediately appear. I finally discovered that the icons only appear after the SSD is formatted. The Raspberry document clearly says that the icons appear once the SSD is connected as said in the documentation quoted below. Source 07 by Raspberry Company describes the SSD installation procedure. Below, the typos have been corrected with the 3 Ed.Notes.
Quote from within Source 07
*******************************
Congratulations, you have successfully installed the M.2 HAT+. Connect your Raspberry Pi to power; Raspberry Pi OS will automatically detect the M.2 HAT+. If you use Raspberry Pi Desktop, you should see an icon [Ed.Note: actually two ions, show above)] representing the drive on your desktop. [Ed.Note: The icons are NOT visible until the SSD has been initialised.] If you don't use a desktop, you can find the drive at /dev/nvme0n1 [Ed.Note: even if it has not been initialised]. To make your drive available for file access automatically, consider configuring automatic mounting.
*******************************
The absence of the icons, made me conclude that the SSD was not recognized by the OS and I thought that I had done something wrong, such as improper installation of the FFC cable. Fortunately, the Raspberry documentation quoted above says that the OS also indicates the presence of the (unformatted) SSD in the '/dev' folder as shown below:

(To enlarge .....Click it)

thumb: IMG_1524.jpg
nvme0n1p1 folder in '/dev' indicating an SSD drive


The nvme0n1p1 and nvme0n1p2 folders, shown above, indicate the presence of two partitions (boot and user partitions) on a formatted OR unformatted SSD drive. Seeing these folders, shown above, caused me to conclude that I probably needed to install more software on the SSD or the Raspberry Pi 5 in order for the icons to appear. Source 07 by Raspberry Pi describes the procedure to format and install the OS on the NVMe SSD. After a few more steps, the two icons appeared as expected.

Other Considerations:

A- Orientation of the flat FFC cable

The conductors on the end of the FFC (Flat Flex Cable) exist only on one side. If the cable is inserted backwards, no signals will be passed. Some of these flat FFC cables have traces (conductors) that are thicker (or thinner) so that some lines have different resistance. It may be possible to insert them backwards, which will introduce the wrong resistance on specific pins. Less is said about this for the more recent boards, so this issue may be board-dependant. Furthermore, the physical insertion of the tiny cable into either connector may be skewed (inserted at a wrong angle), it must be truly at 90 degrees. Beware, intermittent functioning may result.

B- Acceptable Length of SSD card

There are four different lengths of SSD cards. Often, the shorter cards have smaller storage capacities. Many HATs (boards) can only accept the shorter SSD cards. Be sure to buy a HAT that accepts the length of SSD to be used. The boards that accept longer SSD cards are preferable, so that the capacity (storage) can be upgraded in the future by replacing a short SSD card with a longer one. Beware that higher capacity SSDs require more power and also require more cooling.

C- Screws to tie-down the SSD card

There are two issues here. Often, a nut is only pre-mounted on the HAT board to tie down the longer SSD. Sometimes a spare nut is provided to tie-down the shorter SSDs. Some HATs are shipped with no tie-down nuts or bolts. The second issue is whether the tie-down nut & bolt are easily accessible once the HAT is firmly mounted. If not, all the mounting bolts must be unscrewed in order to swap SSDs. This is not an issue if the SSD will seldom be replaced.

D- SATA SSDs are not compatible with NVMe SSDs

A tiny SATA SSD plugs into a different connector than does a NVMe SSD (The "notch" is in a different position). Furthermore, there are two sizes of SATA connectors. This means that an unknowledgeable user might buy a SATA SSD but sadly discover that a NVMe SSD is required when used with an RPi 5 PCIe connector. This is because a Raspberry 5B NVMe HAT only has a NVMe M.2 connector not a SATA connector.

E- SSDs can be plugged into any USB-3 port

To make this slightly more complicated, electronic USB housings exist that accept NVMe M.2 SSD cards. If it is desirable to connect a NVMe M.2 SSD card to a non-Raspberry 5 (such as a Raspberry 4), a USB housing can be purchased that will accept an NVMe M.2 SSD card. This author successfully uses the exact same make and model of NVMe M.2 card (by Geekworm) interchangeably with a Raspberry 4 and with a Raspberry 5. In fact, the author successfully installs and runs such a NVMe M.2 SSD on a Raspberry 4 via a USB-3 port. Furthermore this same SSD (and housing) that connects to the USB-3 port on a Raspberry 4 can also be successfully plugged into the USB-3 port on a Raspberry 5 and it will work fine. If one wishes to run an OS drive on a Raspberry 4 and alternatively on a Raspberry 5, it must be done using a USB-3 port. This is seldom mentioned in articles because most users connect a SSD card to a single Raspberry computer once and leave it there forever. But an OS (on a NVMe SSD) set up to run on a Raspberry 5 via a PCIe connector will NOT run on a Raspberry 4. So initially set it up with an OS that will run on the Respberry 4 via a USB-3 port, then it will be possible to run it on a Raspberry 5. Beware when purchasing a SSD card for your Raspberry 5, especially if buying a high capacity, expensive SSD card. Mistakes can be costly.

F- A 4 Terabyte External Drive will not run on a Raspberry

The author uses a 3 Terabyte External USB Drive for backups. Occassionally, an old file will need to be retrieved from the external backup drive. The author has been able to retrieve such files by plugging the external drive into any USB port and reading it. However, files written to a 4 Terabyte External Drive by a Windows-10 laptop were not able to be read by a Raspberry computer. Apparently, Raspberry computers cannot do read nor write operations on such large drives. Beware: test to make sure that your external backup drive can be used with your Raspberry computer. Don't find out only when it is too late. Another problem arose with this drive. While copying a very large backup to this 4 Terabyte drive, a write error occured. It was impossible to use this drive after the write error. Perhaps these two incidents are related.

A video of a similar installation

Video Source 01 is a fast-paced description of the installation of the same Raspberry M.2 HAT+. The narrator has an Asian Indian accept, but eventually becomes easier to understand. His name is unknown. Also included is a written transcript listing the many steps he follows and describes in the video. Finally, he shows how to run a speed test of the resulting SSD drive running the Raspberry Operating System. Readers who prefer videos to documents will enjoy this video. As often occurs, many of the comments offer additional interesting information.

Video HashTags:

#RaspberryPi #RaspberryPiNVMe #NVMeOnRaspberryPi #M2HatPlus #RaspberryPiStorage #RaspberryPiSpeedTest #NVMeSSD #RaspberryPiUpgrade #RPiNVMeInstallation #RPiSpeedBoost #RaspberryPiPerformance #RPiProjects #RaspberryPiTutorial #Pi4NVMe #M2Adapter #RPiStorageExpansion #RaspberryPiMods #RaspberryPiSetup #NVMeDriveSpeedTest #RPiOptimization

PineBoards from PiHut

As of 2025Cmar21, PiHut (Source 08) sells PineBoard products even though the PineBoard company no longer exists. Of course, buying a product that is no longer in production is usually not advised.

Case from SeeedStudio for their RPi 5 SSD HAT


(To enlarge .....Click it)

thumb: IMG_1549.jpg
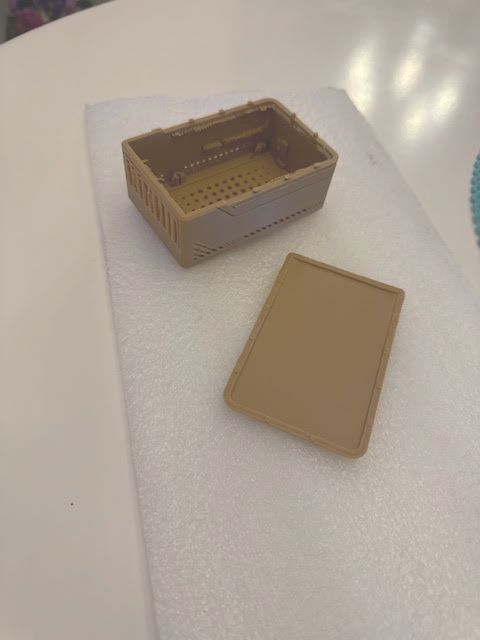
light green 3D printed case for the RPi 5 (left)
(To enlarge .....Click it)

thumb: IMG_1550.jpg
Raspberry Pi 5 in the 3D printed case (right)


The image above left shows the RPi 5 (front left) and the SeeedStudio Case (Top Right). No HAT is attached in this situation. As can be seen the cut-out holes for all six connectors exist and are correctly positioned. In fact the mounting screw holes also exist. There are also 2 tiny rectangular holes at the back to view the status of the 2 leds. An attempt was made to provide access to the on/off power push-button at the back of the RPi 5 but the author does not know how to "cut it away" from the case. The author accidentally destroyed the cover and will request that a new one be 3D printed. This case can enclose and protect an RPi 5 even if no NVMe HAT is connected under it as shown above right. When doing this, it will be necessary to raise the RPi 5 about 3/8 of an inch (placing it on a piece of "foam" shipping material is fine). Thanks go out to Myrle Asper for printing this case for the author. He says that it only took a few hours for the 3D printing. The STP design for this case can be found in Source 03. The author is not very familiar with 3D printed objects and needs to learn how to separate the cover from the case by making a small incision in the plastic all around. This incision can be and should be very deep (eg 1 inch deep) to free the cover completely. It is very interesting that this design included a long ribbon of plastic positioned on its side (like a very long series of figure 8s) to support the cover that is printed "in situ" on top of the case. Once the cover was separated, it was very easy to remove and discard this long ribbon using a small pair of needle-nose pliers. Many slots have been "designed into" this case to provide adequate air flow for cooling. They can be manually punched out using a small slot screwdriver. With no cover in place, the GPIO pins, the connector for the Real Time Clock battery and the two video connectors are unobstructed. Of course, there is space at the back for a PCIe FFC cable to be routed to the SSD HAT board.

There is not enough room at the back for the 2 wire power cable to be attached to the GPIO pins from the "NVMe BASE for the RPI5" HAT. This would require the creation of an additional hole in the case to access the external power connector. The 2 wire power cable would need to be routed externally to connect it to the GPIO pins. The physical size of the "NVMe BASE for the RPI5" HAT is slightly too big to fit in the SeeedStudio case. Perhaps if the SeeedStudio case were printed 3% larger, the "NVMe BASE for the RPI5" HAT might fit.

The WaveShare HAT and the Raspberry Pi HAT are mounted above the Raspberry Pi 5 and easily fit in the SeeedStudio case. It may be necessary to raise the HAT using a piece of "foam" shipping material to correctly locate all of the connectors in the cut-out holes.

The PineBoards HAT fits in the case and works fine if mounted above the Raspberry Pi 5. But it cannot be mounted below the Raspberry Pi 5 because the board's dimensions are too big. Perhaps if the SeeedStudio case were printed 3% larger, the "PineBoards" HAT might fit below the Raspberry Pi 5.

The iimage below left shows the SeeedStudio Case wiith its top presliced using software (courtesy of Myrle Asper). Tiny support posts still exist that need to be manually removed post-build.

(To enlarge .....Click it)

thumb: SlicedCaseB
Software Sliced CaseB
(To enlarge .....Click it)

thumb: IMG_1552
Sliced Case with ribbon cable
The image above right shows the need for the "lowered sidewall" when a ribbon cable is connected to the Raspberry Pi in the case.

Video 02 is a 360 degree view of the latest version of the SeeedStudio Case with a software sliced top with support bumps (by Myrle Asper) and built 3% oversized. To view the video, download it first, then use a movie viewer to watch it.

Raspberry Pi On-Line WebSite

Raspberry has created a very comprehensive WebSite that describes its products, software and documentation. In 2025 it looks like this. The WebSite can be found in Book Source B222:01 below:

(To enlarge .....Click it)

thumb: Screenshot_1.jpg
Raspberry Pi WebSite


The following keyboard shortcuts might be of interest on an updated Raspberry Pi 4 or 5. Not all of them worked when the author tried them.

(To enlarge .....Click it)

thumb: Screenshot_2.jpg
Raspberry Pi Keyboard shortcuts in labwc

Unrelated Thoughts

Home Control using a Raspberry Pi

Source 05 describes various software systems to control a home that can be run on a Raspberry Pi 5. One of them simply implements Google Assistant. Others are more powerful.

Automated Web Page Generation

Most of the web pages created and published by the author are written using simple HTML code. In this article, two more automated methods were used. Source 02 was initially written as a text file, then it was copied and pasted into a LibreOffice document. Images could then be added, but none were added. Then LibreOffice was used to generate the final web page in Source 02, but not without difficulties.

Source 04 is a document that was created by the AI assistant named DeepSeek. This document was then pasted into a LibreOffice document. The author slightly editted this LibreOffice document. Subsequently the document was converted into a web page in html format found in Source 04. Source 09 will take you to the DeepSeek AI chatBot for text conversations.

Sources

Book Sources

Book Source B222:01: Raspberry Pi WebSite Raspberry Pi Online Documentation (~400pp) No ISBN c2025

Video Sources

Video Source V222:01: Use NVMe with Raspberry Pi via M.2 Hat+ & Speed Test (14:02 ms) by ??? of SPARKLERS on Oct 19, 2024
Video Source V222:02: Exploring the SeeedStudio Case V2 (1:10 ms) by Myrle Asper on Apr 02, 2025

Web Sources

Web Source S222:01:www New Empty Web Page in 222E.html from David Cole on 2025Cmar20
Web Source S222:02:www Installing a NVMe HAT (by Raspberry) on a Raspberry Pi5 from David Cole on 2025Cmar14
Web Source S222:03:www STP drawing of a case for the RPi 5 with Seeed M.2 hat from SeeedStudio on 2025Cmar10
Web Source S222:04:www NVMe HATs For Raspberry Pi 5 verB2 from DeepSeek & David Cole on 2025Cmar14
Web Source S222:05:www smart home control systems using a Raspberry Pi from Raspberry Pi Tips on 2025Cmar20
Web Source S222:06:www Images of the SSD HAT Project from David Cole on 2025Cmar14
Web Source S222:07:www Using the M.2 HAT+ with Raspberry Pi 5 from Nate Contino of Raspberry Company on 22nd Jul 2024
Web Source S222:08:www PineBoards HatDriveDual for a Raspberry Pi5 from PiHut on 2025Cmar21
Web Source S222:09:www DeepSeek AI chat website from DeepSeek on 2025Cmar21
Web Source S222:10:www Raspberry Pi connector for PCIe from Raspberry before 2025Cmar21


/SourcesEnd


There is a way to "google" any of the part-numbers, words or phrases in all of the author's articles. This "google-like" search limits itself ONLY to his articles. Just go to the top of "Articles by Old King Cole" and look for the "search" input box named "freefind".

Click here to return to Articles by Old King Cole

Date Created:2025 C Mar 20
Last Updated:2025 D Apr 02

All rights reserved 2025 by © ICH180RR

saved on LeNovo D:\DevD\Globat\ePhotoCaption.com\a\222\222.html
backed up to https://ePhotoCaption.com\a\222\222_2025Cmar20.html

Font: Courier New 10 (monospaced)
/222.html