214 IX: pir2_CheckUp.py With RPi5GPIO (214.html)
Keywords
ICH180RR RPi5GPIO RPi.GPIO gpiozero "Raspberry Pi 5"
"BroadCom GPIO Pin Numbers" GPIO.BCM Python Thonny "Cytron Maker pHAT"
"Maker pHAT" "RPi.GPIO Replacement" "RPi 5 Python" "RPi 5B" RPi-5B RPi5B
Raspberry "Raspberry Pi 5B" Python3 pir2_CheckUp.py pir2_CheckUp_C.py
RPi7GPIO pir2Monitor pir2Monitor.py
/KeywordsEnd
(To enlarge .....Click it)

IX or (IX by DC) or "|><"
This article is a part of the IX family of software.
Introduction
The pir2_CheckUp_C.py program verifies that the pir2 hardware and the necessary software functions and libraries exist and operate correctly. This program should be run when using a new environment for the pir2 hardware. These routines have been slightly modified so that they will operate correctly on the Raspberry Pi 5. The modifications were necessary because the RPi.GPIO function library does not work for the Raspberry Pi 5. Version C of the pir2_Check.pi program can be found in Source 01. The main library of the required functions (for pir2) is named pir2A.py and is in Source 02. It has been slightly modified to make use of RPi7GPIO. The RPi7GPIO library is a modified version of the RPi.GPIO library. It uses the gpiozero library that handles the GPIO pins. RPi7GPIO.py (in Source 03) will eventually be named RPi5GPIO.py . These routines have been designed to operate with all Raspberry Pi computers. The only GPIO pins used are those physically numbered from physical number 01 to 09. This was done to ensure that the pir2 system works on all Raspberry Pi computers, even those that have less than 40 pins.
This version (C) of pir2_CheckUp.py has a few issues, mostly pertaining to new features. These programs have been tested on a Raspberry Pi 4 and on a Raspberry Pi 5B where they work as well. It should be noted that RPi.GPIO has been deprecated for the RPi 5B. The author has created a replacement for RPi.GPIO. The replacement is named RPi7GPIO. It accepts all of the author's former invocations of RPi.GPIO with very few Python code changes.
The pir2 program (which is not included here) logs pir2 activities and sends the log to the MehInCharge web site.
The pir2Monitor program simply monitors the temperature of an area and sounds an alarm when necessary. It is described but
has not yet been written (as of 2023BFeb05).
The pir2 Environment Monitor Hardware
(To enlarge .....Click it)
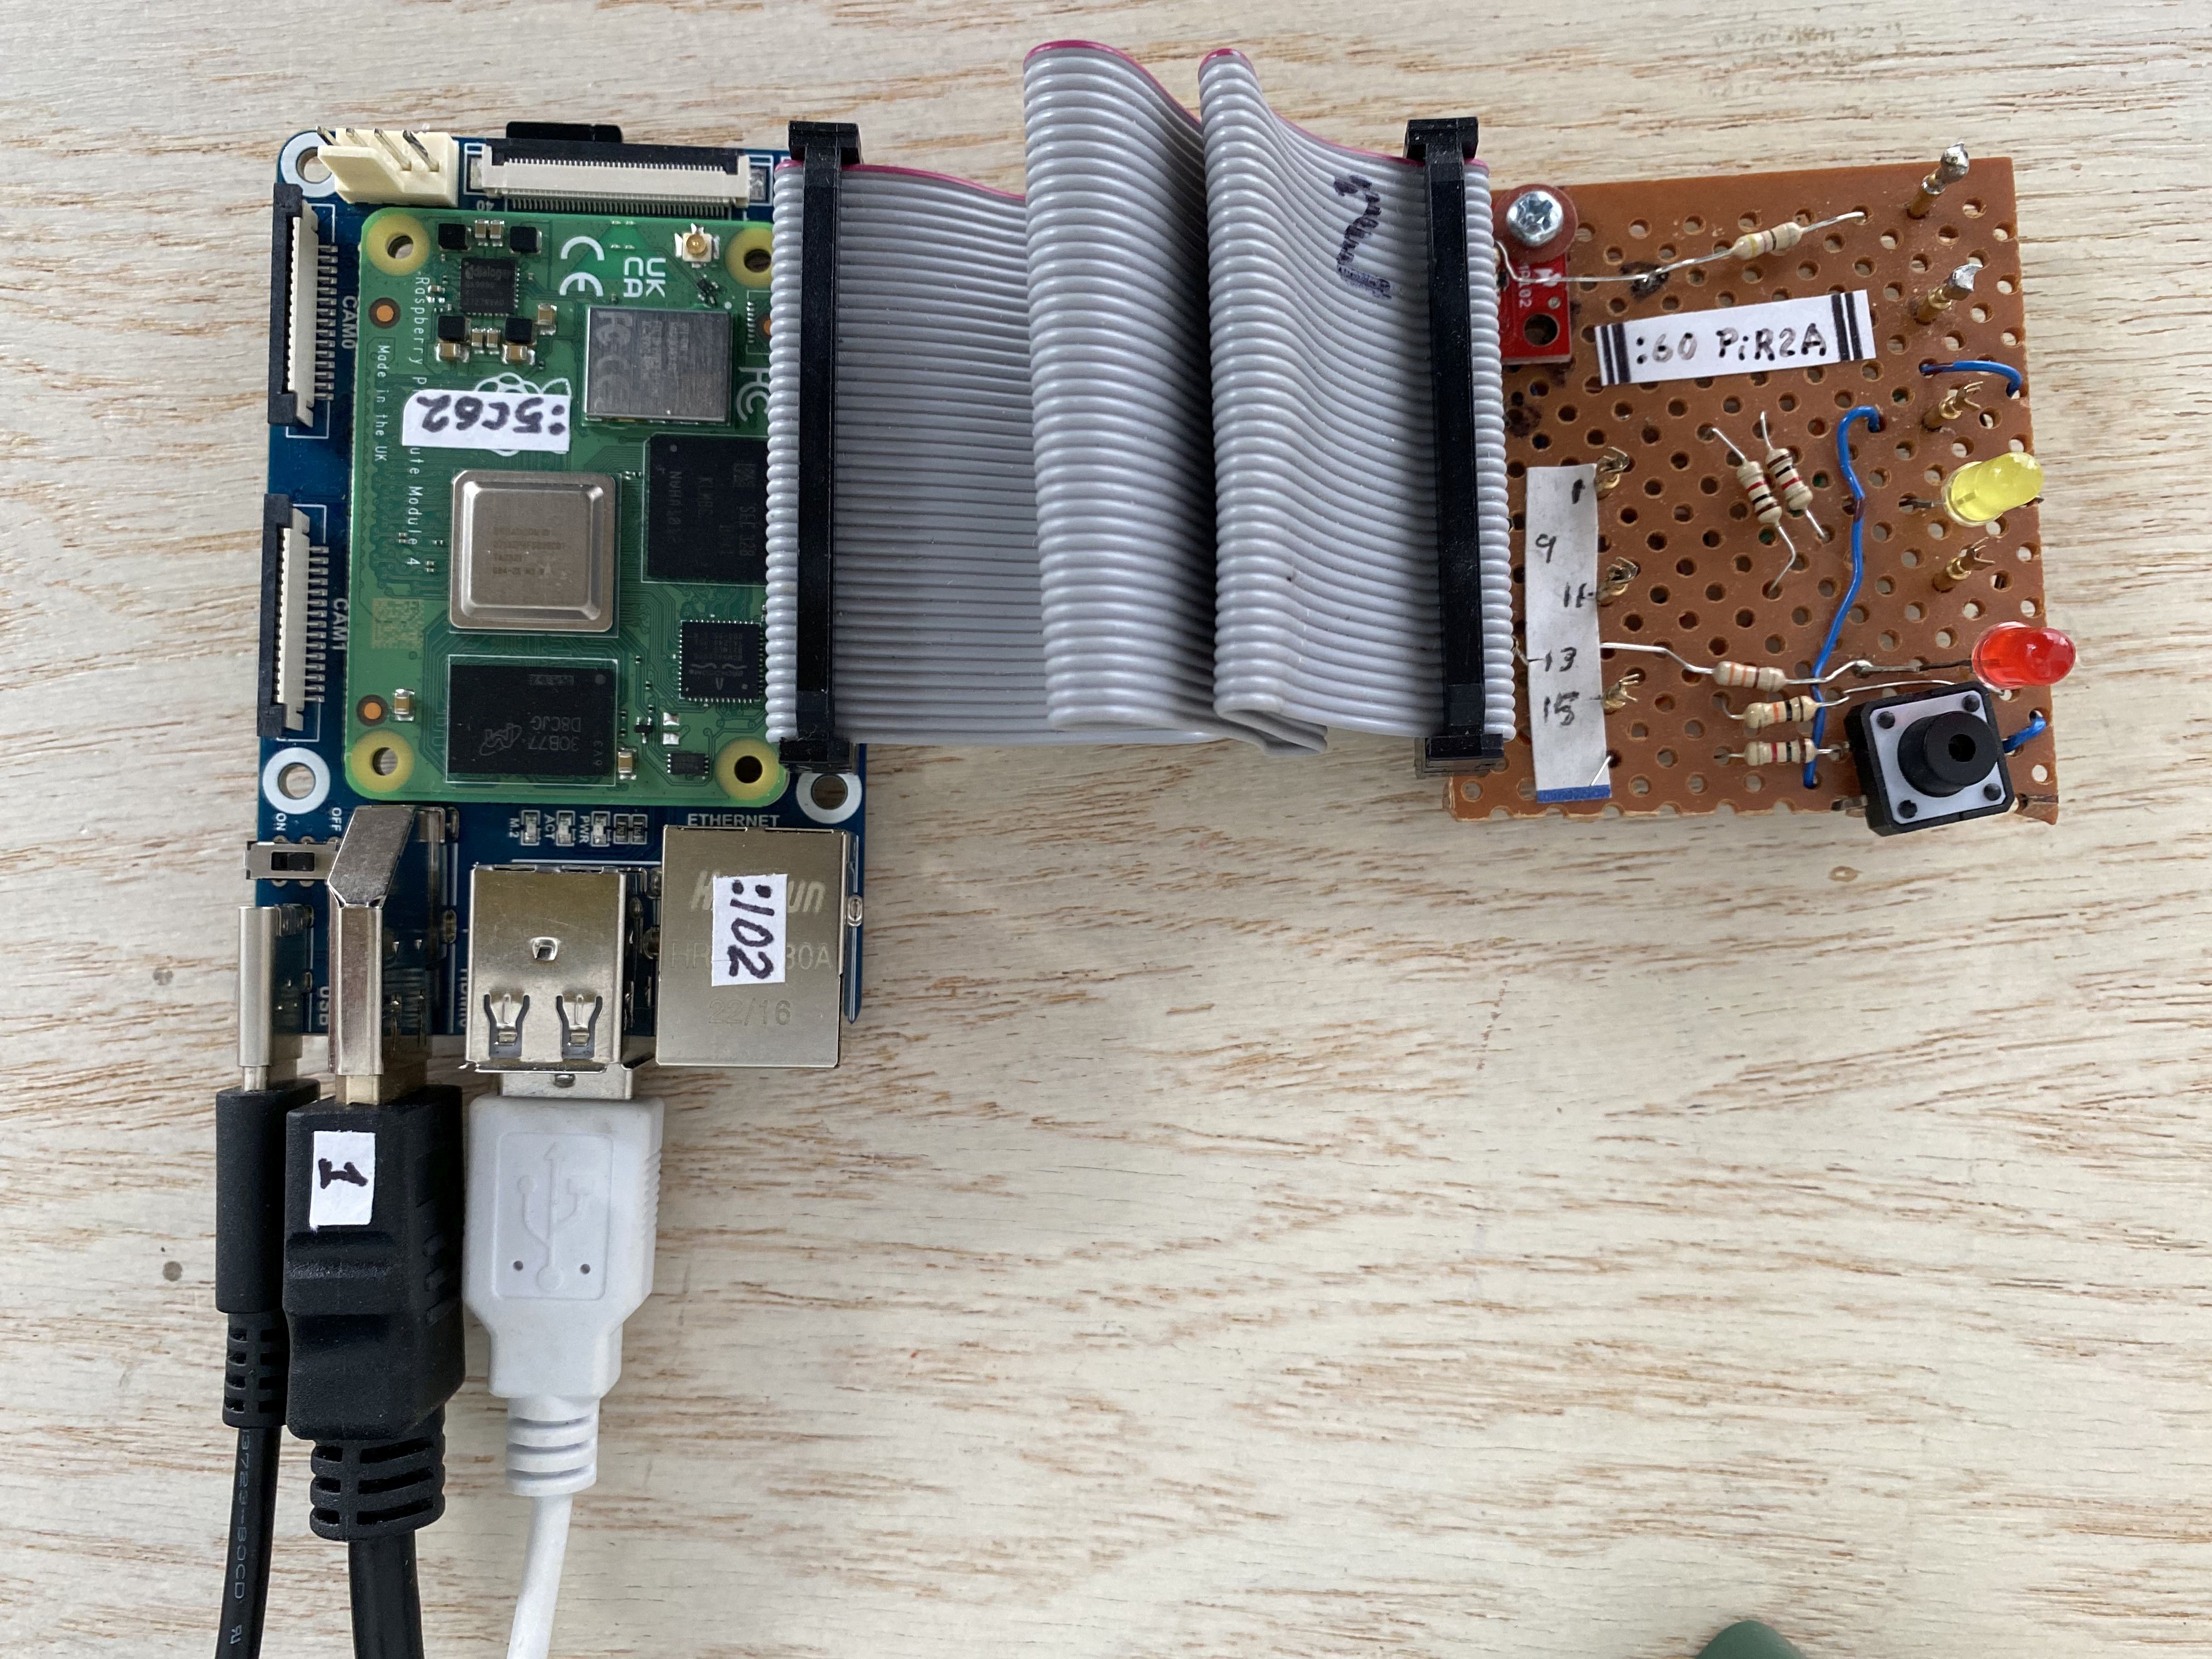
CM4 with PiR2A IMG_0138.jpg
The pir2 and its pir2.py Python program were designed to measure the environment in a area of a building. The temperature of the environment is measured by a TMP102 thermometer. The 2 leds and the pushbutton of the pir2 provide the user interface of the pir2. The pertinent device numbers are:
DEVICE			GPIO PIN/ADDRESS/INFO	USE
red led pin		27			alarm ON
yellow led		17			heat ON
device present pin	18			device presence
push button		22			from user
TMP102			bus 1 0x0048		I2C thermometer
RPi 4B / RPi 5B		RPi.GPIO / RPi7GPIO	gpio library
pir2_CheckUp.py
The pir2_CheckUp.py program (version C) performs the following tests:
-
identifies the pir2_CheckUp program
-
identifies whether RPi.GPIO or RPi5GPIO is being used
-
displays the alarm message mechanism
-
expects the user to acknowledge the alarm
-
blinks the red LED twice then the yellow LEDs twice
-
tests the pushbutton
-
expects the user to hit Enter
-
displays the ambient temp
-
heats up the thermometer (for 10 seconds)
-
lets the thermometer cool down (for 110 seconds)
-
sound the audible alarm twice to signal the end of the test
-
During the pir2 thermometer tests, the temperature of the pir2 is displayed every 5 seconds. The pir2 "heater" (made visible by the yellow LED) should raise its temperature by approximately .5 degrees C after 10 seconds of "heat". After the heater is turned off, the temperature should return to normal at the end of 120 seconds (2 minutes). The thermometer used is a TMP102 that is read using I2C. Version C of the pir2_CheckUp program has been tested on a Raspberry Pi 4B, Raspberry Pi 5B and the Raspberry Compute Module. This is the first real-life implementation of the RPi7GPIO (future RPI5GPIO) routine for the Raspberry Pi 5. The author wrote the 4 Python programs that are found in Source 01, Source 02, Source 03 and Source 04. The author also built the pir2 environment controller.
The pir2 Monitor Program: pir2Monitor
An extension of the pir2_CheckUp program has been planned and will be named the "pir2Monitor" program. It has been designed to monitor the environment of a kitchen area. It will begin operation immediately upon booting up the Raspberry Pi. It is designed to notify the kitchen owner of various temperature alarms. Its first mode of operation is called "Mode 0" (aka Mode Zero) which is the mode of operation for the Raspberry Pi upon boot-up when unattended. Mode 0 monitors the ambient temperature and signals an alarm if the ambient temperature is "out of range". The normal range of temperatures is between 10°C and 25°C. If the ambient temperature is too low, the yellow LED blinks. If the ambient temperature is too high, the red LED blinks. These "out of range" alarm conditions will also trigger an audible and visual alarm, but only if the Raspberry Pi is equipped with the necessary peripherals such as a display and buzzer. An HDMI TV is sufficient. In a future version of the pir2Monitor.py, the "out of range" alarm will also send an email alarm message to the owner of the kitchen area.
A number of minor files are required by the pir2_CheckUp_C.py program. They can be downloaded and unzipped from Source 05. These two folders of files should be unzipped into the Desktop.
Other Modes of Operation for the pir2Monitor
The pir2 environment monitor is designed to be controlled in a headless mode (without display nor keyboard nor mouse).
The seven modes of operation are listed below:
Mode	 0	1	 2	 3	 4	5	6	7
High	+25	+5	 0	A+2	T-10	T	T+10	-
Low	+10	+1	-5	A-2
Mode 0 monitors the Ambient Temperature and signals an alarm when this temperature is "out of range"
Mode 1 monitors the temperature of a refrigerator and signals an alarm when its temperature is "out of range"
(the range is between +1 and +5 for a fridge.)
Mode 2 monitors the temperature of a freezer and signals an alarm when its temperature is "out of range"
(the range is between 0 and -5 for a freezer.)
Mode 3 monitors the temperature of the environment in the current location of the pir2. When the pir2 device
starts up the temperature at boot-time is measured and is saved as A (the ambient temperature). If the
temperature is +2°C or -2°C beyond A, an alarm is triggered. This mode applies to the
temperature of the room, the fridge or the freezer.
Mode 4 constantly displays a number that is relative to the temperature being sensed (known as A). In Mode 4, the
pir2Monitor program displays A-10 which is usually a number between 1 and 16. This number is displayed to the
user by blinking the red LED. If the ambient temperature is 16°C (which is a normal ambient room
temperature) the red LED will blink 6 times
followed by a pause then it will blink 6 times again. The actual temperature will also appear on
the display if one is present. The user must mentally add 10 to the blink count.
Mode 5 constantly displays the internal temperature of a fridge. In this case, A will be the temperature of
the fridge compartment, which may be between +5°C and +1°C. If the temperature of the fridge
is 4°C, the red LED will blink 4 times between pauses.
Mode 6 is similar to Mode 5 except that it applies to the temperature of a freezer. In this case the number of
blinks will be A+10. The freezer temperature is often between 0 and -5°C. If the actual freezer
temperature is -2°C, the red LED will blink 8 times between pauses. The user must mentally subtract
10 from the number of blinks counted.
Mode 7 is not really a mode at all. It does NOT display a temperature at all, but will display the mode instead.
If the pushbutton is depressed and held down, the yellow LED will display the number of the mode that the
pir2 is using to operate. The mode number will be displayed again after a suitable pause as long as the
pushbutton is depressed.
Meaning of the blinks of the red and yellow LEDS
In mode 0 the pir2 constantly monitors the ambient room temperature and signals only when the ambient
room temperature is "out of range". If the ambient room temperature is too high, the red LED
will blink once, pausing between blinks. If the ambient room temperature is too low then the
yellow LED will blink once between pauses. Therefore any red blinks mean "too high or too hot". Any
yellow blinks mean "too low or too cold". The pir2 does NOT change the number of blinks according to
the number of degrees of temperature out of range.
In modes 1 and 2, it is expected that the pir2 sensor is located in the fridge or freezer respectively.
The appropriate range of temperatures for the fridge or freezer will be used.
In mode 3, the actual temperature at boot time is measured. If the temperature deviates by more than
2°C, the red LED will signal an alarm if too high. The yellow LED will signal an alarm if the
temperature is at least 2°C too low. This mode is applicable regardless of the location of the
pir2 thermometer. To measure the temprature change of a different location, simply reboot the pir2
by powering it off then on again.
In modes 4, 5 or 6, the red LED will blink the temperature using the red LED
Selecting the Mode Number
To select Mode 3, simply depress the pushbutton three times, allowing a very short pause between presses.
To check the mode of operation, as described above, simply hold the pushbutton depressed long enough to
count the yellow LED blinks between each pause. Any mode can be selected by pressing the button the
number of times which identifies the mode.
Modifying the Temperature Range
To do this, the program code must be changed. To convert this program to Fahrenheit from Celsius, code
must also be modified.
Source Code
The source code modifications for the pir2Monitor program have not yet been made (as of 2024BFeb03).
Sources
Video Sources
Video Source V214:01: Test_RPi5GPIO_D.py on RPi 5B (0:0:05) by D@CC on 2024 A Jan 21
Web Sources
Web Source S214:01:www  pir2_CheckUp_C.py (as text) by D@CC on 2024AJan29
Web Source S214:02:www
pir2A.py (as text) by D@CC on 2024AJan29
Web Source S214:03:www
RPi7GPIO.py (as text) by D@CC on 2024AJan29
Web Source S214:04:www
pir2Data_py.txt (as text) by D@CC on 2024BFeb04
Web Source S214:05:www  pir2_CheckUp_2024BFeb05.7z (zip) by D@CC on 2024BFeb05
/SourcesEnd
There is a way to "google" any of the part-numbers, words or phrases in all of the author's articles. This "google-like" search limits itself ONLY to his articles. Just go to the top of "Articles by Old King Cole" and look for the "search" input box named "freefind".
Date Created:2024 A Jan 29
Last Updated:2024 D Apr 17
All rights reserved 2024 by © ICH180RR
saved in E:\E\2022\DevE\MyPagesE\Globat\ePhotoCaption.com\a\214\214.html
backed up to ePhotoCaption.com\a\214\214_2024AJan29.html
Font: Courier New 10 (monospaced)
/214.html